 Kia Sedona: Turn signal lamp/Position lamp
1. Open the hood.
2. Remove the front cover(1) and headlamp assembly nuts(2).
3. Remove the headlamp assembly from the body of the vehicle
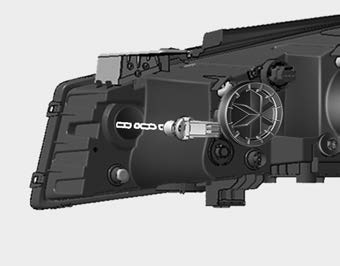
4. Remove the socket from the assembly by turning the socket counterclockwise until the tabs on the socket align with the slots on the assembly.
5. Remove the bulb from the socket by pressing it in and rotating it counterclockwise until the tabs on the bulb align with the slots in the socket. Pull the bulb out of the socket
6. Insert a new bulb by inserting it into the socket and rotating it until it locks into place.
7. Install the socket in the assembly by aligning the tabs on the socket with the slots in the assembly. Push the socket into the assembly and turn the socket clockwise.
✽ NOTICE
If bulb will not rotate inside socket, remove bulb, rotate 180 Specifications Components and Components Location
1. Open the hood.
2. Remove the front cover(1) and headlamp assembly nuts(2).
3. Remove the headlamp assembly from the body of the vehicle
4. Remove the headlamp bulb cover by turning it counte ...
 Headlamp (bulb type) -high/low
1. Open the hood.
2. Remove the front cover(1) and headlamp assembly nuts(2).
3. Remove the headlamp assembly from the body of the vehicle
4. Remove the socket from the assembly by turning the so ...
 Front side marker
Other Information:
Specifications
Smart Key Unit
ItemsSpecificationRated voltageDC 12VOperating voltageDC 9 ~ 16VOperating temperature-22°F ~ 167°F (-30°C ~ 75°C)LoadMax. 2.9mA (When welcome light function off ...
Components
1. RH Cylinder head2. RH Cylinder head gasket3. LH Cylinder head4. LH Cylinder head gasket5. Cylinder block
1. Camshaft bearing cap 2. Camshaft thrust bearing cap 3. RH Exhaust ca ...
Categories
- Home
- First Generation
- Second Generation
- Third generation
- Kia Sedona YP 2014-2026 Owners Manual
- Kia Sedona YP 2014-2026 Service Manual
