 Kia Sedona: Trailing Arm Repair procedures
Third generation YP (2014-2026) / Kia Sedona YP Service Manual / Suspension System / Rear Suspension System / Trailing Arm Repair procedures
| Removal |
| 1. |
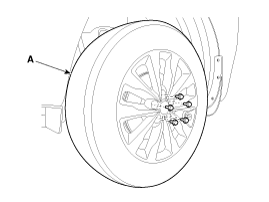
Remove the rear wheel and tire (A) from rear hub .
|

| 2. |
Remove the rear caliper assembly.
(Refer to Barke System - "Rear Disc Brake") |
| 3. |
Remove the parking brake cable.
(Refer to Brake System - "Parking Brake Assembly") |
| 4. |
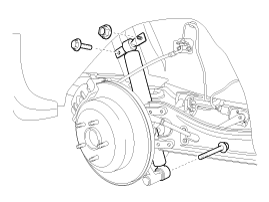
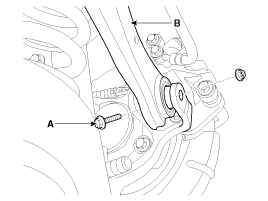
Remove the rear shock absorber upper bolt (A) and nut (B).
|
| 5. |
After loosening the nut (A), remove the rear shock absorber (B).
|

| 6. |
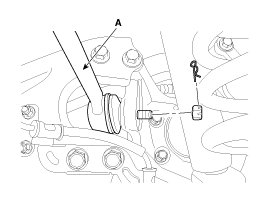
After loosening the nut, remove the assist arm (A) from the rear axle.
|
| 7. |
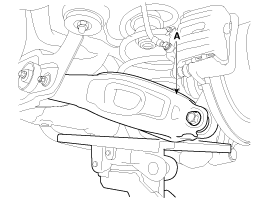
Using a jack, support the rear lower arm (A).
|
| 8. |
Remove the bolt (A) from the rear upper arm (B).
|
| 9. |
Remove the bolt (B) from the lower arm.
|

| 10. |
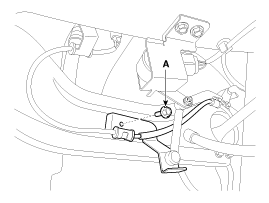
Remove the wheel speed bracket bolt (A).
|
| 11. |
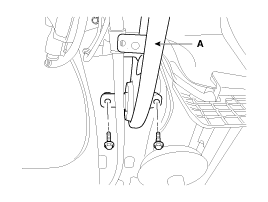
After loosening the bolt, remove the trailing arm (A) from the body side member.
|
| 12. |
Remove it along with the rear axle. |
| 13. |
Install in the reverse order of removal. |
| 14. |
Check the rear alignment.
(Refer to Rear Suspension System - "Rear Alignment") |
 Rear Coil Spring Repair procedures
Removal
1.
Remove the rear wheel and tire (A) from rear hub.
Tightening torque :
88.2 ~ 107.8 N.m (9.0 ~ 11.0 kgf.m, 65.0 ~ 79.5 lb-ft)
Be careful not to damage ...
 Rear Assist Arm Repair procedures
Removal
1.
Remove the rear wheel and tire (A) from rear hub.
Tightening torque:
88.2 ~ 107.8 N.m (9.0 ~ 11.0 kgf.m, 65.0 ~ 79.5 lb-ft)
Be careful not to damage ...
Other Information:
Child restraint system
Children riding in the vehicle should sit in the rear seat and must always be
properly restrained to minimize the risk of injury in an accident, sudden stop or
sudden maneuver.
According to accid ...
Front Mud Guard Repair procedures
Replacement
Put on gloves to protect your hands.
•
When prying with a flat-tip screwdriver, wrap it with
protective tape, an ...
Categories
- Home
- First Generation
- Second Generation
- Third generation
- Kia Sedona YP 2014-2026 Owners Manual
- Kia Sedona YP 2014-2026 Service Manual

Copyright © www.kisedona.com 2016-2026