 Kia Sedona: Rear Assist Arm Repair procedures
Third generation YP (2014-2026) / Kia Sedona YP Service Manual / Suspension System / Rear Suspension System / Rear Assist Arm Repair procedures
| Removal |
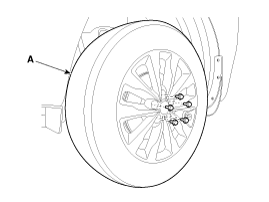
| 1. |
Remove the rear wheel and tire (A) from rear hub.
|

| 2. |
Remove the rear caliper assembly.
(Refer to Barke System - "Rear Disc Brake") |
| 3. |
Remove the parking brake cable.
(Refer to Brake System - "Parking Brake Assembly") |
| 4. |
Remove the rear shock absorber upper bolt (A) and nut (B).
|
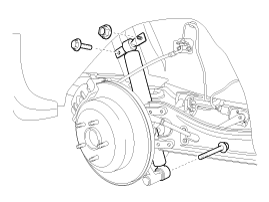
| 5. |
After loosening the nut (A), remove the rear shock absorber (B).
|

| 6. |
Using a jack, support the rear lower arm (A).
|
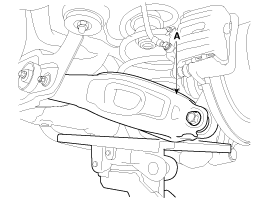
| 7. |
Remove the bolt (B) from the lower arm.
|

| 8. |
After loosening the nut, remove the assist arm (A) from the rear axle.
|
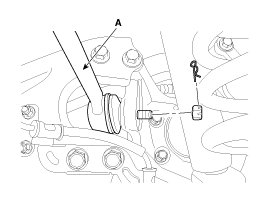
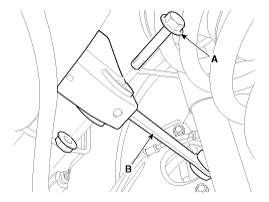
| 9. |
After loosening the bolt (A), remove the assist arm (B).
|
| 10. |
Install in the reverse order of removal. |
| 11. |
Check the rear alignment.
(Refer to Rear Suspension System - "Rear Alignment") |
| Inspection |
| 1. |
Check the bushing for wear and deterioration. |
| 2. |
Check the rear assist arm for deformation. |
 Trailing Arm Repair procedures
Removal
1.
Remove the rear wheel and tire (A) from rear hub .
Tightening torque:
88.2 ~ 107.8 N.m (9.0 ~ 11.0 kgf.m, 65.0 ~ 79.5 lb-ft)
Be careful not to damage ...
 Rear Stabilizer Bar Repair procedures
Removal
1.
Remove the rear wheel and tire (A) from rear hub .
Tightening torque:
88.2 ~ 107.8 N.m (9.0 ~ 11.0 kgf.m, 65.0 ~ 79.5 lb-ft)
Be careful not to damage ...
Other Information:
Repair procedures
Removal
1.
Disconnect the battery negative cable from the battery and then wait for at least 30 seconds.
2.
Turn the steering wheel so that the front wheels can face straight ahead.
3.
R ...
Compressor Repair procedures
Removal
1.
If the compressor is marginally operable, run the engine at
idle speed, and let the air conditioning work for a few minutes, then
shut the engine off.
2.
Disconnect the negative ...
Categories
- Home
- First Generation
- Second Generation
- Third generation
- Kia Sedona YP 2014-2026 Owners Manual
- Kia Sedona YP 2014-2026 Service Manual

Copyright © www.kisedona.com 2016-2026