 Kia Sedona: Battery Sensor Repair procedures
Third generation YP (2014-2025) / Kia Sedona YP Service Manual / Engine Electrical System / Charging System / Battery Sensor Repair procedures
| Removal |
| 1. |
Turn the ignition switch OFF. |
| 2. |
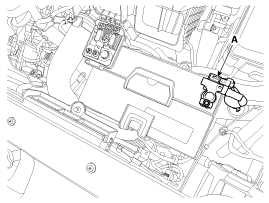
Disconnect the battery negative (-) terminal (A).
|
| 3. |
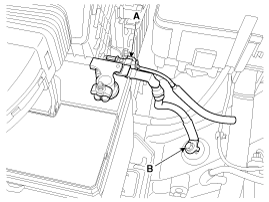
Disconnect the battery sensor connector (A). |
| 4. |
Remove the battery sensor after loosening the sensor cable flange mounting bolts (B).
|
| Installation |
| 1. |
Install in the reverse order of removal.
|
| Adjustment |
Battery Sensor Recalibration Procedure
After reconnecting the battery negative cable, AMS function
does not operate until the system is stabilized, for about 4 hours. If
disconnecting the negative (-) battery cable from the battery during
repair work for the vehicle equipped with AMS function, Battery sensor
recalibration procedure should be performed after finishing the repair
work.
| 1. |
Turn the Iginition switch ON and OFF. |
| 2. |
Park the vehicle for about 4 hours with the hood and all doors closed. |
 Battery Sensor Description and Operation
Description
Vehicles have many control units that use more electricity.
These units control their own system based on information from various
sensors. It is important to provide a stable power ...
Other Information:
Front head restraints
Adjusting the height
Upwards:
Pull the head restraint up to the desired
position; you can feel the head restraint clicking
into position.
Downwards:
Press lug A to lower the head restraint.
...
Front Door Outside Handle Repair procedures
Replacement
1.
Remove the hole plug (A).
2.
After loosening the mounting bolt, remove the front door outside handle cover (B).
Tightening torque :
7.8 ~ 11.8 N.m (0.8 ~ 1.2 kgf.m, 5.8 ~ 8. ...
Categories
- Home
- First Generation
- Second Generation
- Third generation
- Kia Sedona YP 2014-2025 Owners Manual
- Kia Sedona YP 2014-2025 Service Manual
Copyright В© www.kisedona.com 2016-2025


