
 Kia Sedona: Heater & A/C Control Unit (Rear) Components and Components Location
Third generation YP (2014-2026) / Kia Sedona YP Service Manual / Heating,Ventilation And Air Conditioning / Controller / Heater & A/C Control Unit (Rear) Components and Components Location
Components (1)
| [Standard] |
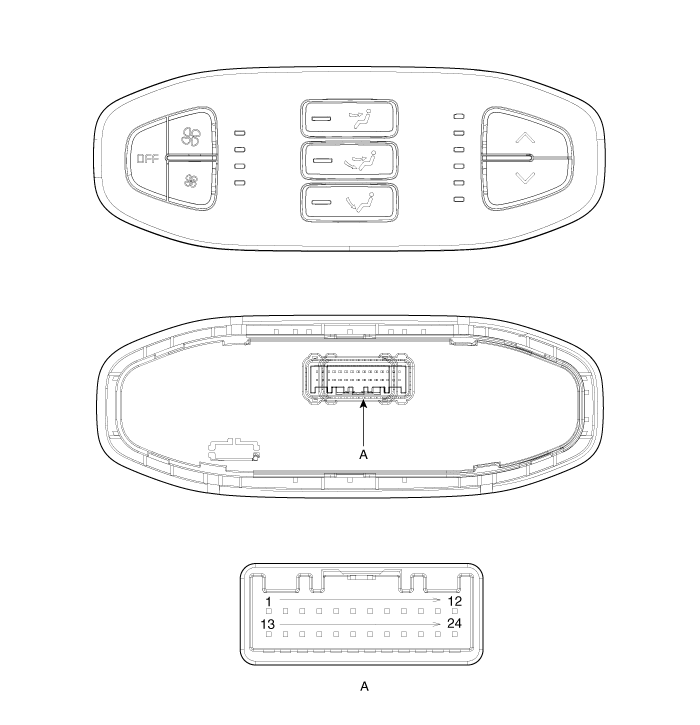
| Connector Pin Function |
| Connector | Pin No | Function | ||
| A | 1 | BATT | ||
| 2 | ILL+ (TAIL) | |||
| 3 | MODE ACT''R F/B - REAR | |||
| 4 | MODE ACT''R (VENT) - REAR | |||
| 5 | MODE ACT''R (FLOOR) - REAR | |||
| 6 | TEMP ACT''R F/B - REAR | |||
| 7 | TEMP ACT''R (COOL) - REAR | |||
| 8 | TEMP ACT''R (WARM) - REAR | |||
| 9 | - | |||
| 10 | - | |||
| 11 | - | |||
| 12 | ILL- (RHEO) | |||
| 13 | IGN2 | |||
| 14 | SENSOR REF (+5V) | |||
| 15 | FET (GATE) - REAR | |||
| 16 | FET (DRAIN F/B) - REAR | |||
| 17 | BLOWER MOTOR (+) - REAR | |||
| 18 | CLIMATE_COMM SIGNAL | |||
| 19 | CLIMATE_COMM GND | |||
| 20 | - | |||
| 21 | DETENT OUT (-) | |||
| 22 | - | |||
| 23 | SENSOR GND | |||
| 24 | GND | |||
Components (2)
| [A.T.C Type] |
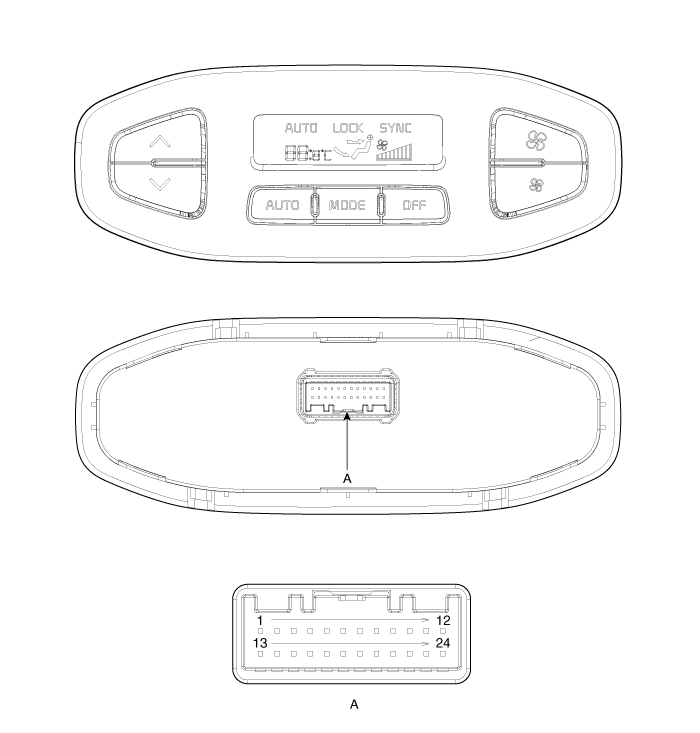
| Connector Pin Function |
| Connector | Pin No | Function | ||
| A | 1 | BATT | ||
| 2 | ILL+ (TAIL) | |||
| 3 | MODE ACT''R F/B - REAR | |||
| 4 | MODE ACT''R (VENT) - REAR | |||
| 5 | MODE ACT''R (FLOOR) - REAR | |||
| 6 | TEMP ACT''R F/B - REAR | |||
| 7 | TEMP ACT''R (COOL) - REAR | |||
| 8 | TEMP ACT''R (WARM) - REAR | |||
| 9 | - | |||
| 10 | INCAR SENSOR (+) - REAR | |||
| 11 | - | |||
| 12 | ILL- (RHEO) | |||
| 13 | IGN2 | |||
| 14 | SENSOR REF (+5V) | |||
| 15 | FET (GATE) - REAR | |||
| 16 | FET (DRAIN F/B) - REAR | |||
| 17 | BLOWER MOTOR (+) - REAR | |||
| 18 | CLIMATE_CAN HIGH | |||
| 19 | CLIMATE_CAN LOW | |||
| 20 | - | |||
| 21 | DETENT OUT (-) | |||
| 22 | - | |||
| 23 | SENSOR GND | |||
| 24 | GND | |||
 Heater & A/C Control Unit (DATC) Repair procedures
Self Diagnosis
1.
Self-diagnosis process
2.
How to read self-diagnostic code
After the display panel flickers three times at 0.5 second
intervals, the corresponding fault code flickers on t ...
 Heater & A/C Control Unit (Rear) Repair procedures
Replacement
Put on gloves to protect your hands.
•
When prying with a flat-tip screwdriver, wrap it with
protective tape, an ...
Other Information:
Ignition Coil Description and Operation
Description
An ignition coil is an induction coil in an engine''s
ignition system which transforms the battery''s low voltage to the high
voltage needed to create an electric spark in the spark ...
Limp home (override) procedure
When you turn the ignition switch to the ON position, if the immobilizer indicator
() goes off after blinking 5 times, your
transponder equipped in the ignition key is out of order. You cannot sta ...
Categories
- Home
- First Generation
- Second Generation
- Third generation
- Kia Sedona YP 2014-2026 Owners Manual
- Kia Sedona YP 2014-2026 Service Manual

Copyright © www.kisedona.com 2016-2026