 Kia Sedona: Heater & A/C Control Unit (Rear) Repair procedures
Third generation YP (2014-2026) / Kia Sedona YP Service Manual / Heating,Ventilation And Air Conditioning / Controller / Heater & A/C Control Unit (Rear) Repair procedures
| Replacement |
Put on gloves to protect your hands. |

|

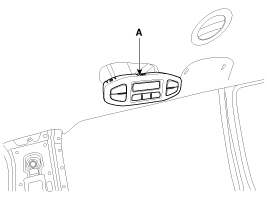
| 1. |
Using a screwdriver or ornament remover, remove the rear heater & A/C controller (A).
|
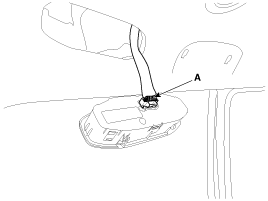
| 2. |
Disconnect the rear heater & A/C controller connector (A).
|
| 3. |
Install in the reverse order of removal.
|

 Heater & A/C Control Unit (Rear) Components and Components Location
Components (1)
[Standard]
Connector Pin Function
Connector Pin NoFunctionA1BATT2ILL+ (TAIL)3MODE ACT''R F/B - REAR4MODE ACT''R (VENT) - REAR5MODE ACT''R (FLOOR) - REAR6TEMP ACT''R F/B - ...
Other Information:
Owner maintenance schedule
When you stop for fuel:
Check the engine oil level.
Check the coolant level in the coolant reservoir.
Check the windshield washer fluid level.
Look for low or under-inflated tires.
WA ...
Turn signals and lane change signals
The ignition switch must be on for the turn signals to function. To turn on the
turn signals, move the lever up or down (A). The green arrow indicators on the instrument
panel indicate which tur ...
Categories
- Home
- First Generation
- Second Generation
- Third generation
- Kia Sedona YP 2014-2026 Owners Manual
- Kia Sedona YP 2014-2026 Service Manual

Copyright © www.kisedona.com 2016-2026