 Kia Sedona: Blind Spot Detection Switch Repair procedures
Third generation YP (2014-2026) / Kia Sedona YP Service Manual / Body Electrical System / Blind Spot Detection System / Blind Spot Detection Switch Repair procedures
| Removal |
| 1. |
Disconnect the negative (-) battery terminal. |
| 2. |
Remove the crash pad lower panel.
(Refer to Body - "Crash Pad Lower Panel") |
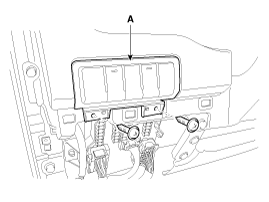
| 3. |
Remove the crash pad lower switch (A) after loosening the mounting screws.
|
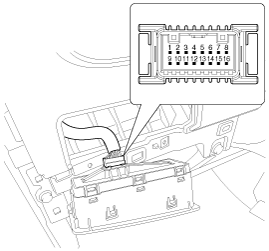
| 4. |
Disconnect the connector (A) from the crash pad lower switch.
|

| Installation |
| 1. |
Connect the crash pad lower switch connector. |
| 2. |
Install the crash pad lower switch and crash pad lower panel. |
| 3. |
Connect the negative (-) battery terminal. |
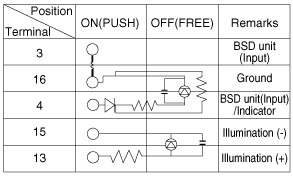
| Inspection |
| 1. |
Disconnect the BSD switch connector from the crash pad lower switch assembly.
|
| 2. |
Operate the BSD switch, then check for continuity between terminals BSD switch connector.
|
 Blind Spot Detection Switch Schematic Diagrams
Circuit Diagram
...

Other Information:
Panic
1. Press the panic button (6) for more than 1 second.
2. The horn sounds and hazard warning light flash for about 27 seconds.
✽ NOTICE
To stop the horn and lights, press any button on the sm ...
Delivery Pipe Repair procedures
Removal
When removing the high pressure fuel pump, high pressure fuel
pipe, delivery pipe, and injector, injury may be caused by leakage of
high pressure fuel. For ...
Categories
- Home
- First Generation
- Second Generation
- Third generation
- Kia Sedona YP 2014-2026 Owners Manual
- Kia Sedona YP 2014-2026 Service Manual

Copyright © www.kisedona.com 2016-2026