
 Kia Sedona: Sunroof Assembly Repair procedures
Third generation YP (2014-2026) / Kia Sedona YP Service Manual / Body (Interior and Exterior) / Sunroof / Sunroof Assembly Repair procedures
| Replacement |
Put on glove to protect your hands. |

Take care not to scratch the interior trims and other parts. |

| 1. |
Remove the roof trim.
(Refer to Roof Trim - "Roof Trim Assembly") |
| 2. |
Remove the sunroof glass.
(Refer to Sunroof - "Sunroof Glass") |
| 3. |
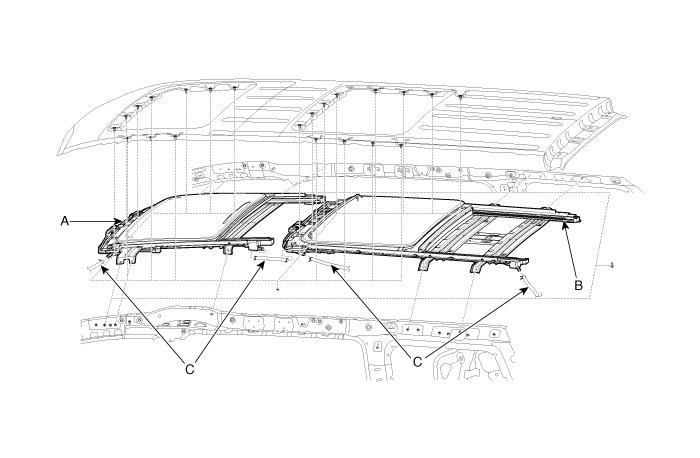
Disconnect the drain tubes (B). |
| 4. |
Loosen the mounting nuts and remove the front sunroof assembly (A), and rear sunroof assembly (B).
|
| 5. |
Install in the reverse order of removal.
|

 Sunroof Deflector Repair procedures
Replacement
1.
Completely open the sunroof glass (A) by pressing the sunroof switch.
2.
Loosen the sunroof deflector mounting screws.
3.
Remove the sunroof deflector (A).
4.
Install i ...
 Sunroof Sunshade Repair procedures
Replacement
[Front]
1.
Remove the sunroof assembly.
(Refer to Sunroof - "Sunroof Assembly")
2.
Loosen the mounting screws and remove the sunshade stoper (A).
3.
Loosen the nuts and re ...
Other Information:
AC inverter
The AC inverter supplies 115V/100W electric power to operate electric accessories
or equipments.
If you wish to use the AC inverter, press the AC inverter button while the engine
is running ...
Rear mode selection
Front climate control is MAX A/C,
: Rear air blows from the upper vents
on the rear ceiling.
Front climate control is : Rear
air blows from the upper vents on the rear ceiling and the l ...
Categories
- Home
- First Generation
- Second Generation
- Third generation
- Kia Sedona YP 2014-2026 Owners Manual
- Kia Sedona YP 2014-2026 Service Manual

Copyright © www.kisedona.com 2016-2026