 Kia Sedona: Smart key unit Repair procedures
Third generation YP (2014-2026) / Kia Sedona YP Service Manual / Body Electrical System / Smart key System / Smart key unit Repair procedures
| Removal |
Smart Key Unit
| 1. |
Disconnect the negative (-) battery terminal. |
| 2. |
Remove the crash pad lower panel.
(Refer to Body - "Crash Pad Lower Panel") |
| 3. |
Remove the glove box housing.
(Refer to Body - "Glove Box Housing") |
| 4. |
Remove the crash pad center panel.
(Refer to Body - "Crash Pad Center Panel") |
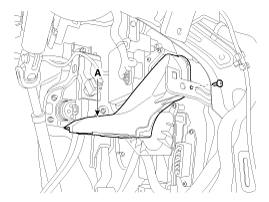
| 5. |
Remove the driver''s shower duct (A) after loosening the screw.
|
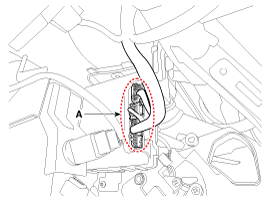
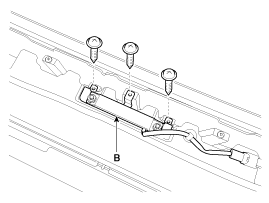
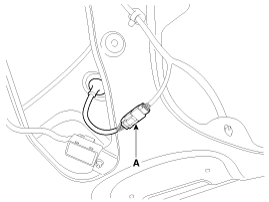
| 6. |
Disconnect the smart key unit connectors (A).
|
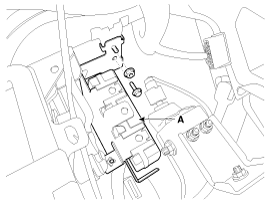
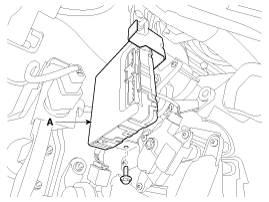
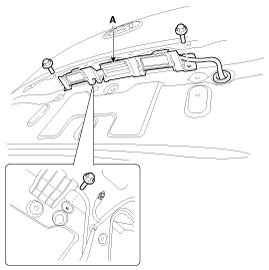
| 7. |
Remove the smart key unit (A) after loosening the bolts and nut.
|
Interior 1 Antenna
Take care not to scratch the crash pad and related parts. |

| 1. |
Disconnect the negative (-) battery terminal. |
| 2. |
Remove the front console assembly.
(Refer to Body - "Floor Console Assembly") |
| 3. |
Disconnect the interior 1 antenna connector (A). |
| 4. |
Remove the interior 1 antenna (B) after loosening the screws.
|
Interior 2 Antenna
Take care not to scratch the crash pad and related parts. |
| 1. |
Disconnect the negative (-) battery terminal. |
| 2. |
Remove the rear consol assembly.
(Refer to Body - "Floor Console Assembly") |
| 3. |
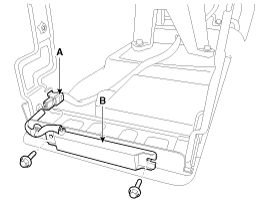
Disconnect the interior 2 antenna connector (A). |
| 4. |
Remove the interior 2 antenna (B) after loosening the bolts.
|
Interior 3 Antenna
Take care not to scratch the crash pad and related parts. |
| 1. |
Disconnect the negative (-) battery terminal. |
| 2. |
Remove the second row seat assembly.
(Refer to Body - "Rear Seat Assembly") |
| 3. |
Remove the third row seat assembly.
(Refer to Body - "Rear Seat Assembly") |
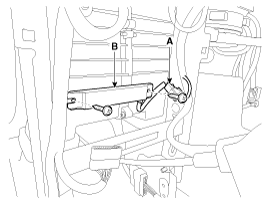
| 4. |
Remove the luggage side trim [LH].
(Refer to Body - "Luggage Side Trim") |
| 5. |
Remove the rear floor carpet.
(Refer to Body - "Floor Carpet") |
| 6. |
Separate the back of the front floor carpet. |
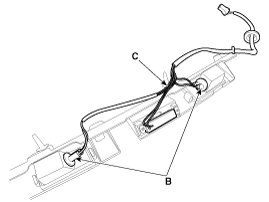
| 7. |
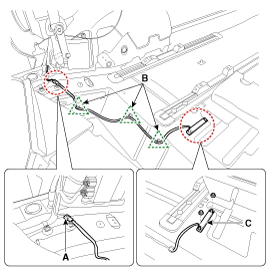
Disconnect the interior 3 antenna connector (A). |
| 8. |
Remove the 3 interior wiring mounting clips (B). |
| 9. |
Remove the 3 interior antenna (C) after loosening the nuts.
|
Rear Bumper Antenna
| 1. |
Disconnect the negative (-) battery terminal. |
| 2. |
Remove the rear bumper cover.
(Refer to Body - "Rear Bumper Cover") |
| 3. |
Disconnect the rear bumper antenna connector (A).
|
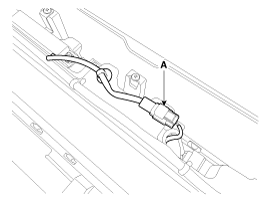
| 4. |
Remove the rear bumper antenna (B) after loosening the screws.
|
Buzzer
| 1. |
Disconnect the negative (-) battery terminal. |
| 2. |
Remove the front wheel guard [LH].
(Refer to Body - "Front Wheel Guard") |
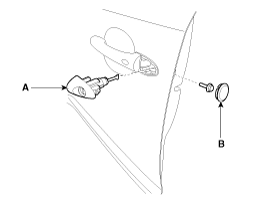
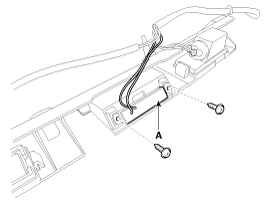
| 3. |
Remove the buzzer (A) after disconnecting the connector
|

Door Outside Handle
| 1. |
Disconnect the negative (-) battery terminal. |
| 2. |
Remove the plug hole (B) and then remove the door lock assembly (A) after loosening the bolt.
|
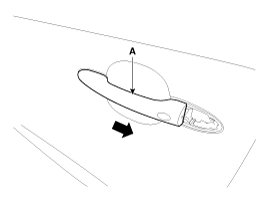
| 3. |
Remove the front door outside handle (A) by sliding it rearward.
|
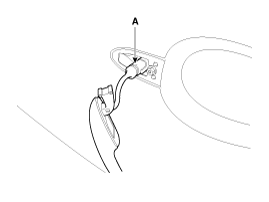
| 4. |
Disconnect the front door outside handle connector (A).
|
Tailgate Open Switch
| 1. |
Disconnect the negative (-) battery terminal. |
| 2. |
Remove the tail gate trim.
(Refer to Body - "Tail Gate Trim") |
| 3. |
Remove the tail gate back panel.
(Refer to Body - "Tail Gate Back Panel") |
| 4. |
Disconnect the tail gate open switch and license lamp connectors (A).
|
| 5. |
Remove the tail gate open switch and license plate lamp (A) by loosening the bolts inside the tail gate.
|
| 6. |
Remove the tail gate open switch assembly (A) after loosening the screws. |
| 7. |
Remove the license lamp bulb (B) and then disconnect the wiring (C).
|
| Installation |
Smart Key Unit
| 1. |
Install the smart key unit. |
| 2. |
Connect the smart key unit connector. |
| 3. |
Install the driver''s shower duct. |
| 4. |
Install the crash pad center panel. |
| 5. |
Install the glove box housing. |
| 6. |
Install the crash pad lower panel. |
| 7. |
Install the negative (-) battery terminal and check the smart key system. |
Interior 1 Antenna
| 1. |
Install the interior 1 antenna. |
| 2. |
Connect the interior 1 antenna connector. |
| 3. |
Install the front console assembly. |
| 4. |
Install the negative (-) battery terminal and check the smart key system. |
Interior 2 Antenna
| 1. |
Install the interior 2 antenna. |
| 2. |
Connect the interior 2 antenna connector. |
| 3. |
Install the rear console assembly. |
| 4. |
Install the negative (-) battery terminal and check the smart key system. |
Interior 3 Antenna
| 1. |
Install the interior 3 antenna. |
| 2. |
Connect the interior 3 antenna connector. |
| 3. |
Install the rear floor carpet assembly. |
| 4. |
Install the luggage side trim [LH]. |
| 5. |
Install the third row seat assembly. |
| 6. |
Install the second row seat assembly. |
| 7. |
Install the negative (-) battery terminal and check the smart key system. |
Rear Bumper Antenna
| 1. |
Install the rear bumper antenna. |
| 2. |
Connect the rear bumper antenna connector. |
| 3. |
Install the rear bumper cover. |
| 4. |
Install the negative (-) battery terminal and check the smart key system. |
Buzzer
| 1. |
Connect buzzer connector after installing the buzzer. |
| 2. |
Install the front wheel guard [LH]. |
| 3. |
Install the negative (-) battery terminal and check the smart key system. |
Door Outside Handle
| 1. |
Connect the door outside handle connector. |
| 2. |
Install the door outside handle. |
| 3. |
Install the door lock assembly. |
| 4. |
Install the negative (-) battery terminal and check the smart key system. |
Tailgate Open Switch
| 1. |
Install the license lamp bulb and the wiring. |
| 2. |
Install the tail gate open switch assembly. |
| 3. |
Install the tail gate open switch and license plate lamp. |
| 4. |
Connect the tail gate open switch and license plate lamp connector. |
| 5. |
Install the tail gate back panel. |
| 6. |
Install the tail gate trim. |
| 7. |
Install the negative (-) battery terminal and check the smart key system. |
| Inspection |
Smart Key Unit
(Refer to Smart Key System - "Smart Key Diagnostic")
Smart Key Switch
(Refer to Smart Key System - "Smart Key Diagnostic")
Antenna
(Refer to Smart Key System - "Smart Key Diagnostic")
Tail Gate Open Switch
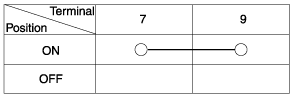
| 1. |
Check for continuity between the tail gate open switch terminals.
|
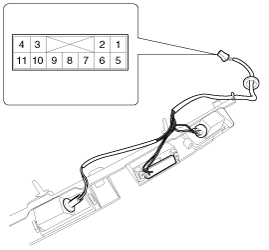
| 2. |
If continuity is not within the specification, inspect the switch.
|
 Smart key unit Schematic Diagrams
Schematic Diagrams
...

Other Information:
Instrument Cluster Components and Components Location
Components
Connector Pin Information
No.DescriptionNo.Description1Ground signal321Trip switch1_Input (-) 2Illumination output (-)22-3Rheostat switch (Down)_Input23Trip switch2_Input (-)&nbs ...
Seat belt precautions
Infant or small child
You should be aware of the specific requirements in your country. Child and/or
infant seats must be properly placed and installed in the rear seat. For more information
abou ...
Categories
- Home
- First Generation
- Second Generation
- Third generation
- Kia Sedona YP 2014-2026 Owners Manual
- Kia Sedona YP 2014-2026 Service Manual

Copyright © www.kisedona.com 2016-2026