 Kia Sedona: Smart key unit Repair procedures
Third generation YP (2014-2025) / Kia Sedona YP Service Manual / Body Electrical System / Smart key System / Smart key unit Repair procedures
| Removal |
Smart Key Unit
| 1. |
Disconnect the negative (-) battery terminal. |
| 2. |
Remove the crash pad lower panel.
(Refer to Body - "Crash Pad Lower Panel") |
| 3. |
Remove the glove box housing.
(Refer to Body - "Glove Box Housing") |
| 4. |
Remove the crash pad center panel.
(Refer to Body - "Crash Pad Center Panel") |
| 5. |
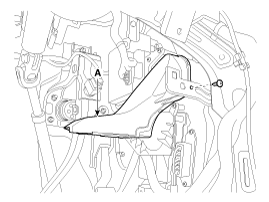
Remove the driver''s shower duct (A) after loosening the screw.
|
| 6. |
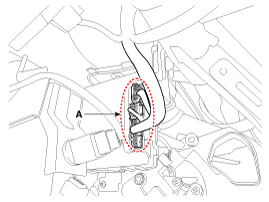
Disconnect the smart key unit connectors (A).
|
| 7. |
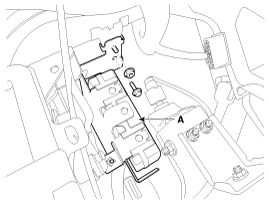
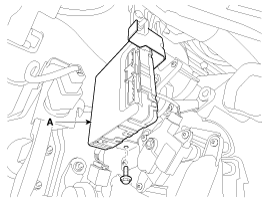
Remove the smart key unit (A) after loosening the bolts and nut.
|
Interior 1 Antenna
Take care not to scratch the crash pad and related parts. |
| 1. |
Disconnect the negative (-) battery terminal. |
| 2. |
Remove the front console assembly.
(Refer to Body - "Floor Console Assembly") |
| 3. |
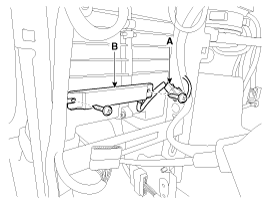
Disconnect the interior 1 antenna connector (A). |
| 4. |
Remove the interior 1 antenna (B) after loosening the screws.
|
Interior 2 Antenna
Take care not to scratch the crash pad and related parts. |
| 1. |
Disconnect the negative (-) battery terminal. |
| 2. |
Remove the rear consol assembly.
(Refer to Body - "Floor Console Assembly") |
| 3. |
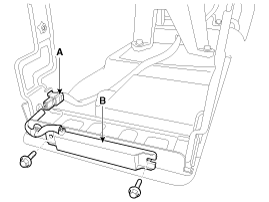
Disconnect the interior 2 antenna connector (A). |
| 4. |
Remove the interior 2 antenna (B) after loosening the bolts.
|
Interior 3 Antenna
Take care not to scratch the crash pad and related parts. |
| 1. |
Disconnect the negative (-) battery terminal. |
| 2. |
Remove the second row seat assembly.
(Refer to Body - "Rear Seat Assembly") |
| 3. |
Remove the third row seat assembly.
(Refer to Body - "Rear Seat Assembly") |
| 4. |
Remove the luggage side trim [LH].
(Refer to Body - "Luggage Side Trim") |
| 5. |
Remove the rear floor carpet.
(Refer to Body - "Floor Carpet") |
| 6. |
Separate the back of the front floor carpet. |
| 7. |
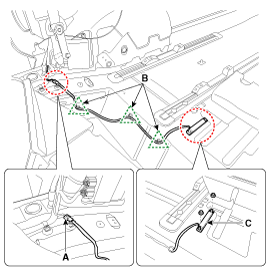
Disconnect the interior 3 antenna connector (A). |
| 8. |
Remove the 3 interior wiring mounting clips (B). |
| 9. |
Remove the 3 interior antenna (C) after loosening the nuts.
|
Rear Bumper Antenna
| 1. |
Disconnect the negative (-) battery terminal. |
| 2. |
Remove the rear bumper cover.
(Refer to Body - "Rear Bumper Cover") |
| 3. |
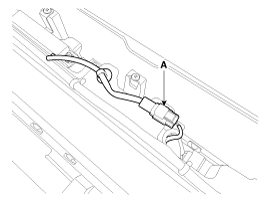
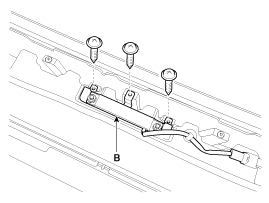
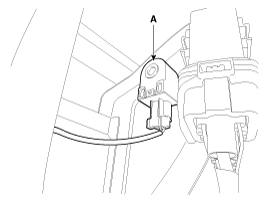
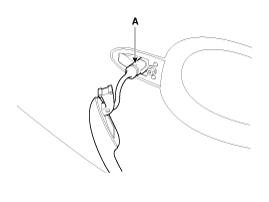
Disconnect the rear bumper antenna connector (A).
|
| 4. |
Remove the rear bumper antenna (B) after loosening the screws.
|
Buzzer
| 1. |
Disconnect the negative (-) battery terminal. |
| 2. |
Remove the front wheel guard [LH].
(Refer to Body - "Front Wheel Guard") |
| 3. |
Remove the buzzer (A) after disconnecting the connector
|
Door Outside Handle
| 1. |
Disconnect the negative (-) battery terminal. |
| 2. |
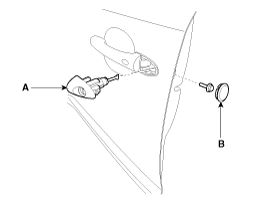
Remove the plug hole (B) and then remove the door lock assembly (A) after loosening the bolt.
|
| 3. |
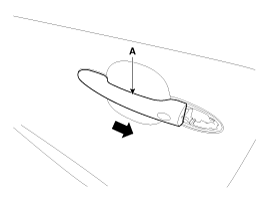
Remove the front door outside handle (A) by sliding it rearward.
|
| 4. |
Disconnect the front door outside handle connector (A).
|
Tailgate Open Switch
| 1. |
Disconnect the negative (-) battery terminal. |
| 2. |
Remove the tail gate trim.
(Refer to Body - "Tail Gate Trim") |
| 3. |
Remove the tail gate back panel.
(Refer to Body - "Tail Gate Back Panel") |
| 4. |
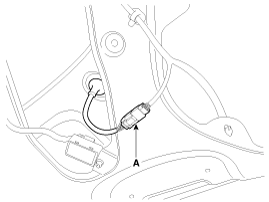
Disconnect the tail gate open switch and license lamp connectors (A).
|
| 5. |
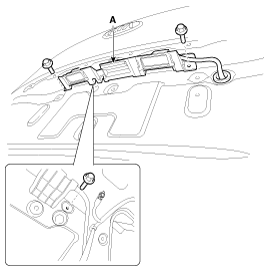
Remove the tail gate open switch and license plate lamp (A) by loosening the bolts inside the tail gate.
|
| 6. |
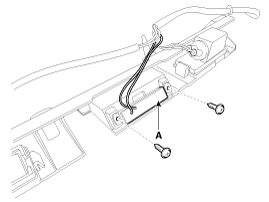
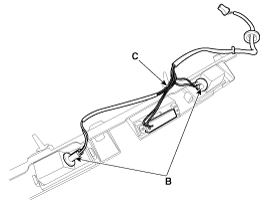
Remove the tail gate open switch assembly (A) after loosening the screws. |
| 7. |
Remove the license lamp bulb (B) and then disconnect the wiring (C).
|
| Installation |
Smart Key Unit
| 1. |
Install the smart key unit. |
| 2. |
Connect the smart key unit connector. |
| 3. |
Install the driver''s shower duct. |
| 4. |
Install the crash pad center panel. |
| 5. |
Install the glove box housing. |
| 6. |
Install the crash pad lower panel. |
| 7. |
Install the negative (-) battery terminal and check the smart key system. |
Interior 1 Antenna
| 1. |
Install the interior 1 antenna. |
| 2. |
Connect the interior 1 antenna connector. |
| 3. |
Install the front console assembly. |
| 4. |
Install the negative (-) battery terminal and check the smart key system. |
Interior 2 Antenna
| 1. |
Install the interior 2 antenna. |
| 2. |
Connect the interior 2 antenna connector. |
| 3. |
Install the rear console assembly. |
| 4. |
Install the negative (-) battery terminal and check the smart key system. |
Interior 3 Antenna
| 1. |
Install the interior 3 antenna. |
| 2. |
Connect the interior 3 antenna connector. |
| 3. |
Install the rear floor carpet assembly. |
| 4. |
Install the luggage side trim [LH]. |
| 5. |
Install the third row seat assembly. |
| 6. |
Install the second row seat assembly. |
| 7. |
Install the negative (-) battery terminal and check the smart key system. |
Rear Bumper Antenna
| 1. |
Install the rear bumper antenna. |
| 2. |
Connect the rear bumper antenna connector. |
| 3. |
Install the rear bumper cover. |
| 4. |
Install the negative (-) battery terminal and check the smart key system. |
Buzzer
| 1. |
Connect buzzer connector after installing the buzzer. |
| 2. |
Install the front wheel guard [LH]. |
| 3. |
Install the negative (-) battery terminal and check the smart key system. |
Door Outside Handle
| 1. |
Connect the door outside handle connector. |
| 2. |
Install the door outside handle. |
| 3. |
Install the door lock assembly. |
| 4. |
Install the negative (-) battery terminal and check the smart key system. |
Tailgate Open Switch
| 1. |
Install the license lamp bulb and the wiring. |
| 2. |
Install the tail gate open switch assembly. |
| 3. |
Install the tail gate open switch and license plate lamp. |
| 4. |
Connect the tail gate open switch and license plate lamp connector. |
| 5. |
Install the tail gate back panel. |
| 6. |
Install the tail gate trim. |
| 7. |
Install the negative (-) battery terminal and check the smart key system. |
| Inspection |
Smart Key Unit
(Refer to Smart Key System - "Smart Key Diagnostic")
Smart Key Switch
(Refer to Smart Key System - "Smart Key Diagnostic")
Antenna
(Refer to Smart Key System - "Smart Key Diagnostic")
Tail Gate Open Switch
| 1. |
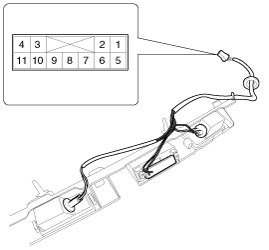
Check for continuity between the tail gate open switch terminals.
|
| 2. |
If continuity is not within the specification, inspect the switch.
|
 Smart key unit Schematic Diagrams
Schematic Diagrams
...
Other Information:
From the rear seat
1. Set the rear climate control selection (REAR ON) button in the front climate
control panel to the ON position.
2. Set the rear climate control selection (REAR LOCK) button in the front climate
...
Blind Spot Detection
For more information,
refer to the General
recommendations on the use of driving
and manoeuvring aids.
This system warns the driver of a potential
danger posed by the presence of another vehicle ...
Categories
- Home
- First Generation
- Second Generation
- Third generation
- Kia Sedona YP 2014-2025 Owners Manual
- Kia Sedona YP 2014-2025 Service Manual
Copyright В© www.kisedona.com 2016-2025

