 Kia Sedona: Repair procedures
Third generation YP (2014-2026) / Kia Sedona YP Service Manual / Body Electrical System / Ignition Switch Assembly / Repair procedures
| Inspection |
| 1. |
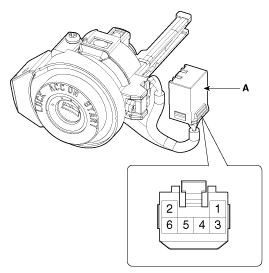
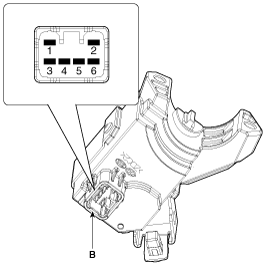
Disconnect the ignition switch connector (B) and key warning switch connector (A) from under the steering column.
|
| 2. |
Check for continuity between the terminals. |
| 3. |
If continuity is not as specified, replace the switch. |

| Removal |
| 1. |
Disconnect the negative (-) battery terminal. |
| 2. |
Remove the crash pad lower panel.
(Refer to Body - "Crash Pad Lower Panel") |
| 3. |
Remove the steering column upper and lower shrouds.
(Refer to Body - "Steering Column Shroud Panel") |
| 4. |
Remove the wiper switch.
(Refer to "Multifunction switch") |
| 5. |
Remove the ignition switch after disconnecting the ignition switch 6P connector. |
| 6. |
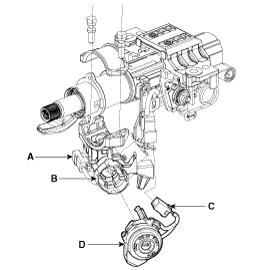
Remove the key warning/immobilizer connector (A). |
| 7. |
After loosening the screw, remove the key warning switch and key Illumination (B). |
| 8. |
If the key lock cylinder (C) needs to be removed, remove the
key lock cylinder while pushing the removal/installation button under
the key cylinder after turning the key to ACC.
|
| Installation |
| 1. |
Install the key lock cylinder. |
| 2. |
Install the key warning and immobilizer connector. |
| 3. |
Install the ignition switch. |
| 4. |
Install the steering column shrouds and crash pad lower panel. |
Other Information:
Record your key number
The key code number is stamped on the bar code tag attached to the key set. Should
you lose your keys, this number will enable an authorized Kia dealer to duplicate
the keys easily. Remove the b ...
Closing the tailgate
To close the tailgate, lower and push down the tailgate firmly. Make sure that
the tailgate is securely latched.
Make sure your hands, feet and other parts of your body are safely out of the
wa ...
Categories
- Home
- First Generation
- Second Generation
- Third generation
- Kia Sedona YP 2014-2026 Owners Manual
- Kia Sedona YP 2014-2026 Service Manual
Copyright © www.kisedona.com 2016-2026


