 Kia Sedona: Radiator Repair procedures
Third generation YP (2014-2026) / Kia Sedona YP Service Manual / Engine Mechanical System / Cooling System / Radiator Repair procedures
| Removal and Installation |
| 1. |
Disconnect the battery negative terminal. |
| 2. |
Remove the engine room under cover.
(Refer to Engine And Transaxle Assembly - "Engine Room Under Cover") |
| 3. |
Drain the engine coolant.
(Refer to Cooling System - "Coolant") |
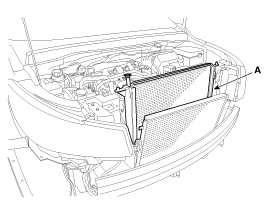
| 4. |
Disconnect the radiator upper hose (A) and lower hose (B).
|

| 5. |
Remove the front bumper cover.
(Refer to Body - "Front Bumper Cover") |
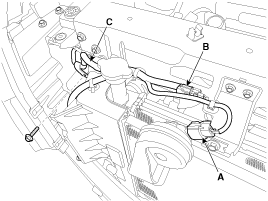
| 6. |
Disconnect the horn connector (A), hood latch connector (B) and over flow hose (C).
|
| 7. |
Remove the cooling fan assembly.
(Refer to Cooling System - "Cooling Fan") |
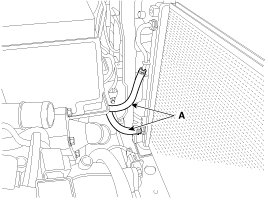
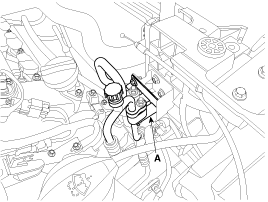
| 8. |
Disconnect the ATF cooler hoses (A).
|
| 9. |
Separate the air guard (A).
[RH]
[LH]
|
| 10. |
Remove the radiator upper bracket (A).
[LH]
[RH]
|
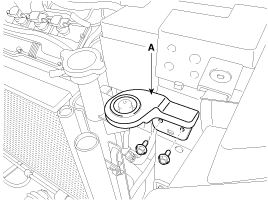
| 11. |
Separate A/C pipe bracket (A).
|
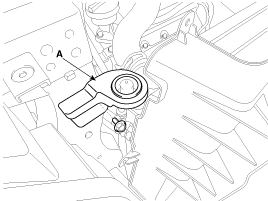
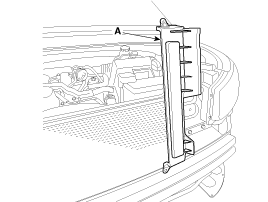
| 12. |
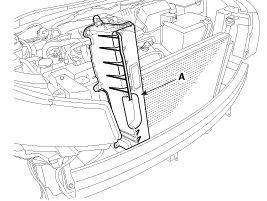
Separate the radiator assembly (A) to obtain space for removing the air guard.
|
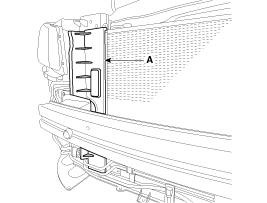
| 13. |
Remove the RH air guard (A).
|
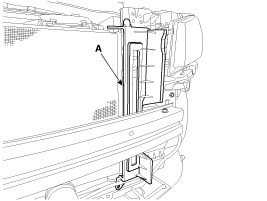
| 14. |
Remove the LH air guard (A).
|
| 15. |
Separate the condenser from the radiator.
[LH]
[RH]
|

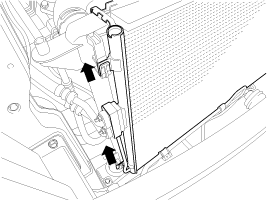
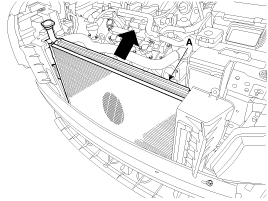
| 16. |
Pull the radiator (A) upward and remove it from engine room.
|
| 17. |
Install in the reverse order of removal. |
| 18. |
Fill the radiator with coolant.
(Refer to Cooling System - "Coolant") |
| 19. |
Start engine and check for leaks. |
| Inspection |
Radiator Cap Testing
| 1. |
Remove the radiator cap, wet its seal with engine coolant, and then install it on a pressure tester.
|
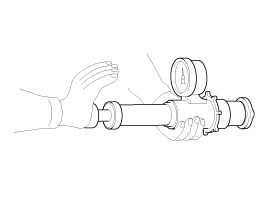
| 2. |
Apply a pressure of 79.43-122.58 kpa (0.81-1.25 kg/cm², 11.52-17.78 psi). |
| 3. |
Check for a drop in pressure. |
| 4. |
If the pressure drops, replace the cap. |
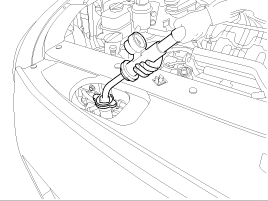
Radiator Leakage Test
| 1. |
Wait for the engine to cool. Carefully remove the radiator
cap and fill the radiator with engine coolant. Then, install it on the
pressure tester. |
| 2. |
Apply a pressure tester to the radiator and apply a pressure of 79.43-122.58 kpa (0.81-1.25 kg/cm², 11.52-17.78 psi).
|
| 3. |
Inspect for engine coolant leaks and a drop in pressure. |
| 4. |
Remove the tester and reinstall the radiator cap.
|

 Radiator Components and Components Location
Components
1. Radiator2. Radiator lower mounting insulator3. Radiator upper mounting bracket (LH)4. Radiator upper mounting bracket (RH)5. Radiator upper hose6. Radiator lower hose7. Radiator c ...
 Reservoir Tank Repair procedures
Removal and Installation
1.
Disconnect the over flow hose (A), and then drain the coolant from the reservoir tank.
2.
Remove the reservoir tank (B).
Tightening torque :
7.8 ~ 11.8 N.m (0.8 ...
Other Information:
Parking Brake Repair procedures
Inspection
Check whether the stroke is within specification when the
parking brake pedal is depressed with 66 lb, 294 N(30 kg) of force.
Also, the parking brake alone should securely hold the v ...
Ambient Temperature Sensor Repair procedures
Inspection
1.
Turn the ignition switch OFF.
2.
Remove the front bumper.
(Refer to Body - "Front Bumper Cover")
3.
Disconnect ambient temperature sensor.
4.
Check the resistance of the ...
Categories
- Home
- First Generation
- Second Generation
- Third generation
- Kia Sedona YP 2014-2026 Owners Manual
- Kia Sedona YP 2014-2026 Service Manual

Copyright © www.kisedona.com 2016-2026