
 Kia Sedona: Parking Brake Assembly Repair procedures
Third generation YP (2014-2026) / Kia Sedona YP Service Manual / Brake System / Parking Brake System / Parking Brake Assembly Repair procedures
| Removal |
Parking Brake Shoe
| 1. |
Raise the vehicle, and make sure it is securely supported. |
| 2. |
Remove the rear tire and wheel. |
| 3. |
Remove the rear brake caliper and Rear disc brake.
(Refer to "Rear disc brake removal") |
| 4. |
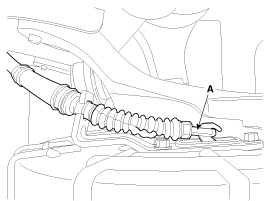
Remove the parking brake cable (A).
|
| 5. |
Remove the hub assembly.
(Refer to Drive shaft and axle - "Rear hub - carrier") |
| 6. |
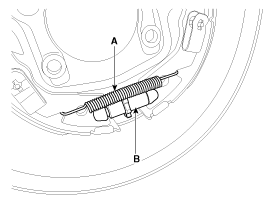
Remove the adjuster assembly (B) and the lower return spring (A).
|
| 7. |
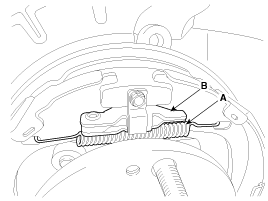
Remove the upper return spring (A) operating lever assembly (B).
|
| 8. |
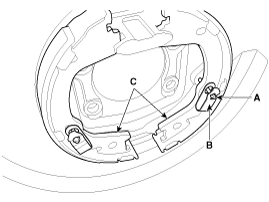
Remove the shoe hold down pin (A) and the spring (B) by pressing and rotating the spring.
|
| 9. |
Remove the brake shoes (C). |
| Installation |
Parking Brake Shoe
| 1. |
Install the shoe hold down pin (A) and spring (B) by pressing and rotating the spring.
|
| 2. |
Install the operating lever assembly (B) and the upper return spring (A).
|
| 3. |
Install the adjuster assembly (B) and the lower return spring (A).
|
| 4. |
Install the hub assembly.
(Refer to Drive shaft and axle - "Rear hub - carrier") |
| 5. |
Install the parking brake cable (A).
|
| 6. |
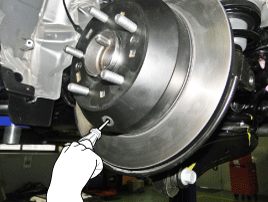
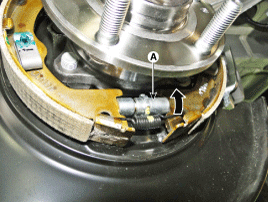
Install the rear brake disc, then adjust the rear brake shoe clearance.
|
| 7. |
Install the brake caliper assembly.
(Refer to Brake system - "Rear disc brake") |
| 8. |
Install the tire and wheel, after installing the plug on the disc. |
| 9. |
If the parking brake shoe or the brake disc is replaced with a new one, perform the brake shoe bed-in procedure.
|

 Components and Components Location
Components (1)
1. Parking brake pedal assembly2. Front parking brake cable3. Equalizer assembly4. Rear parking brake cable
Components (2)
1. Brake shoe2. Operating lever3. Upper spring4. Lo ...
 Parking Brake Pedal Assembly Repair procedures
Removal
1.
Turn ignition switch OFF and disconnect the negative (-) battery cable.
2.
Remove the crash pad lower panel.
(Refer to Body - "Crash pad lower panel")
3.
Remove the junction b ...
Other Information:
Description and Operation
System Configuration
PAS consists of 8 sensors (4 front & 4 rear) that detect
obstacles and transmit the result separately in three warning levels,
the first, second and third to IPM (BCM) ...
One time driving information mode
Type B, C
This display shows trip distance (1), average fuel economy (2) and the vehicle
can be driven with the remaining fuel (3).
This information is displayed for a few seconds when you turn ...
Categories
- Home
- First Generation
- Second Generation
- Third generation
- Kia Sedona YP 2014-2026 Owners Manual
- Kia Sedona YP 2014-2026 Service Manual

Copyright © www.kisedona.com 2016-2026