
 Kia Sedona: Knock Sensor (KS) Repair procedures
Third generation YP (2014-2026) / Kia Sedona YP Service Manual / Engine Control / Fuel System / Engine Control System / Knock Sensor (KS) Repair procedures
| Removal |
| [Bank 1] |
| 1. |
Turn the ignition switch OFF and disconnect the battery negative (-) terminal. |
| 2. |
Remove the intake manifold.
(Refer to Engine Mechanical System - "Intake Manifold") |
| 3. |
Remove the delivery pipe.
(Refer to Fuel Delivery System - "Delivery pipe") |
| 4. |
Remove the mounting bolt (A), and then remove the sensor from the cylinder block.
|
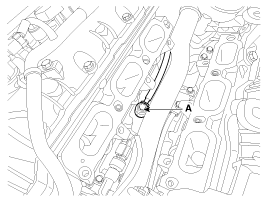
| [Bank 2] |
| 1. |
Turn the ignition switch OFF and disconnect the battery negative (-) terminal. |
| 2. |
Remove the intake manifold.
(Refer to Engine Mechanical System - "Intake Manifold") |
| 3. |
Remove the delivery pipe.
(Refer to Fuel Delivery System - "Delivery pipe") |
| 4. |
Remove the mounting bolt (A), and then remove the sensor from the cylinder block.
|
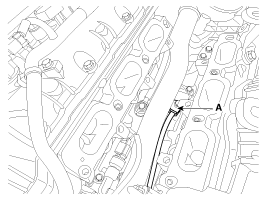
| Installation |
|

| 1. |
Install in the reverse order of removal.
|
 Knock Sensor (KS) Schematic Diagrams
Circuit Diagram
...
 Heated Oxygen Sensor (HO2S) Specifications
Specification
[Bank 1/Sensor 1]
ItemSpecificationHeater Resistance (Ω)3.3 ~ 4.1[20°C(68°F)]
[Bank 1/Sensor 2]
ItemSpecificationHeater Resistance (Ω)3.3 ~ 4.1[20°C(68°F)]
[Ba ...
Other Information:
12,000 km (7,500 miles) or 6 months
❑ Rotate tire
❑ Inspect battery condition
❑ Inspect air cleaner filter
❑ Inspect vacuum hose
❑ Inspect power steering fluid (if equipped)
❑ Inspect power ...
To keep locks from freezing
To keep the locks from freezing, squirt an approved de-icer fluid or glycerine
into the key opening. If a lock is covered with ice, squirt it with an approved
de-icing fluid to remove the ice. If ...
Categories
- Home
- First Generation
- Second Generation
- Third generation
- Kia Sedona YP 2014-2026 Owners Manual
- Kia Sedona YP 2014-2026 Service Manual

Copyright © www.kisedona.com 2016-2026