
 Kia Sedona: External AMP Components and Components Location
Third generation YP (2014-2026) / Kia Sedona YP Service Manual / Body Electrical System / AVN System / External AMP Components and Components Location
| Components |
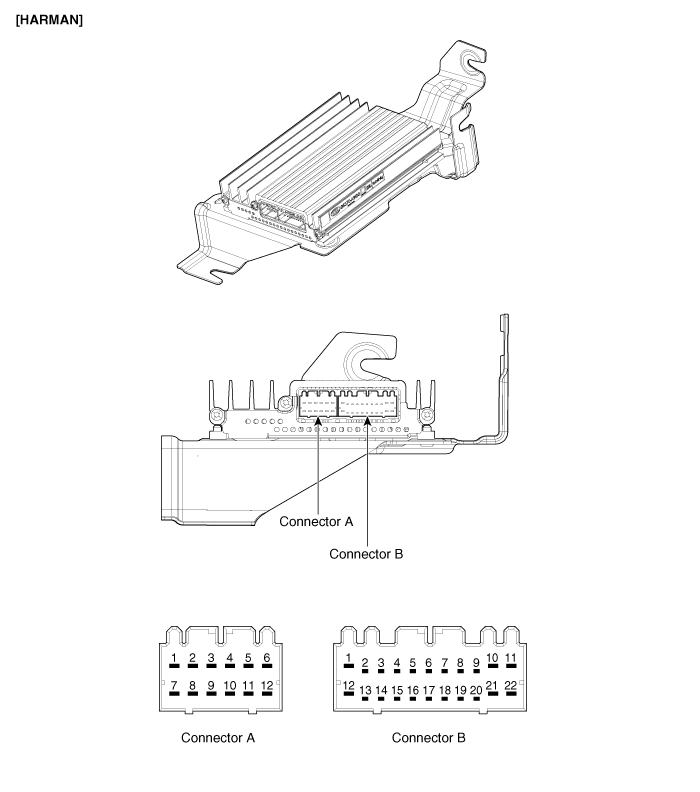
Connector Pin Information
| No. | Connector A | No. | Connector B |
| 1 | Left front door (+) | 1 | Center front (+) |
| 2 | Right front door (+) | 2 | - |
| 3 | Left side door (+) | 3 | - |
| 4 | Right side door (+) | 4 | - |
| 5 | Subwoofer 2 (+) | 5 | Navi (+) |
| 6 | Subwoofer 1 (+) | 6 | ACC |
| 7 | Left front door (-) | 7 | Can (-) |
| 8 | Right front door (-) | 8 | Can (+) |
| 9 | Left side door (-) | 9 | - |
| 10 | Right side door (-) | 10 | V Batt |
| 11 | Subwoofer 2 (-) | 11 | V Batt |
| 12 | Subwoofer 1 (-) | 12 | Center front (-) |
| | | 13 | - |
| 14 | - | ||
| 15 | - | ||
| 16 | Navi (-) | ||
| 17 | SPDIF GND | ||
| 18 | SPDIF (-) | ||
| 19 | SPDIF (+) | ||
| 20 | - | ||
| 21 | GND | ||
| 22 | GND |
 AVN keyboard Repair procedures
Removal
1.
Disconnect the negative (-) battery terminal.
2.
Using a screwdriver or remover, remove the AVN keyboard unit (A).
3.
Disconnect the AVN keyboard unit connector (A).
Installati ...
 External AMP Repair procedures
Removal
1.
Disconnect the negative (-) battery terminal.
2.
Remove the main crash pad assembly.
(Refer to Body - "Main Crash Pad Assembly")
3.
Remove the body control module.
(Refer to " ...
Other Information:
Immobilizer Control Unit Repair procedures
Removal
1.
Disconnect the negative (-) battery terminal.
2.
Remove the driver crash pad lower panel.
(Refer to Body - "Crash Pad Lower Panel")
3.
Disconnect the connector of the immobiliz ...
Front Seat Shield Outer Cover Repair procedures
Replacement
[Front seat shield front cover]
•
When prying with a flat-tip screwdriver, wrap it with
protective tape, and apply protective tape around the re ...
Categories
- Home
- First Generation
- Second Generation
- Third generation
- Kia Sedona YP 2014-2026 Owners Manual
- Kia Sedona YP 2014-2026 Service Manual

Copyright © www.kisedona.com 2016-2026