Kia Sedona: Front Seat Shield Outer Cover Repair procedures - Front Seat - Body (Interior and Exterior) - Kia Sedona YP Service ManualKia Sedona: Front Seat Shield Outer Cover Repair procedures

Third generation YP (2014-2026) / Kia Sedona YP Service Manual / Body (Interior and Exterior) / Front Seat / Front Seat Shield Outer Cover Repair procedures

Replacement
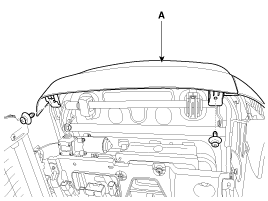
[Front seat shield front cover]
   
•
When prying with a flat-tip screwdriver, wrap it with protective tape, and apply protective tape around the related parts, to prevent damage.
•
Put on gloves to protect your hands.
1.
Remove the front seat assembly.
(Refer to Front Seat - "Front Seat Assembly")
2.
After loosening the mounting screws, remove the front seat shield front cover (A).

3.
Install in the reverse order of removal.
   
Replace any damaged clips.
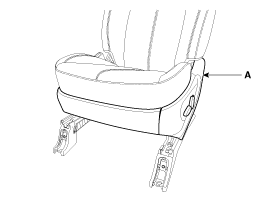
[Front seat shield outer cover]
   
•
When prying with a flat-tip screwdriver, wrap it with protective tape, and apply protective tape around the related parts, to prevent damage.
•
Put on gloves to protect your hands.
1.
Remove the front seat shield front cover.
2.
After loosening the mounting screw, remove the front seat shield outer cover (A).

3.
Push the lock pin, then disconnect the front seat power switch connector (A).

4.
Install in the reverse order of removal.
   
•
Make sure that the connectors are plugged in properly.
•
Replace any damaged clips.
Front Seat Shield Outer Cover Components and Components Location
Component Location 1. Front seat shield front cover2. Front seat shield outer cover ...

Front Seat Shield Inner Cover Components and Components Location
Component Location 1. Front seat shield inner cover ...

Other Information:

Check high beam assist system
This warning message illuminates if there is a malfunction (burned-out bulb or circuit malfunction) with the headlamp. In this case, have your vehicle inspected by an authorized Kia dealer. ...

Rear Center Seat Belt Retractor Repair procedures
Replacement [Second row center seat belt retractor]     When installing the belt, make sure not to damage the retractor. 1. Remove the roof trim assembly. (Refer t ...

Categories

Copyright © www.kisedona.com 2016-2026