 Kia Sedona: Camshaft Position Sensor (CMPS) Repair procedures
Third generation YP (2014-2026) / Kia Sedona YP Service Manual / Engine Control / Fuel System / Engine Control System / Camshaft Position Sensor (CMPS) Repair procedures
| Inspection |
| 1. |
Check the signal waveform of the CMPS and CKPS using the GDS.
|
| Removal |
|

| [Bank 1/Intake] |
| 1. |
Turn the ignition switch OFF and disconnect the battery negative (-) terminal. |
| 2. |
Remove the air cleaner assembly.
(Refer to Engine Mechanical System - "Air Cleaner") |
| 3. |
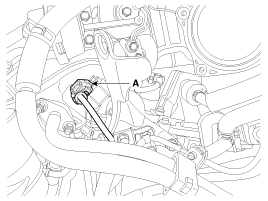
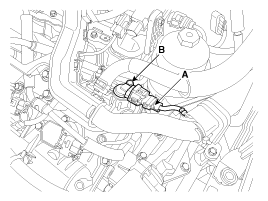
Disconnect the camshaft position sensor connector (A).
|
| 4. |
Remove the mounting bolt, and then remove the engine hanger (A).
|
| 5. |
Remove the mounting bolt, and then vertically remove the sensor (A) from the cylinder head cover.
|
| [Bank 1/Exhaust] |
| 1. |
Turn the ignition switch OFF and disconnect the battery negative (-) terminal. |
| 2. |
Remove the air cleaner assembly.
(Refer to Engine Mechanical System - "Air Cleaner") |
| 3. |
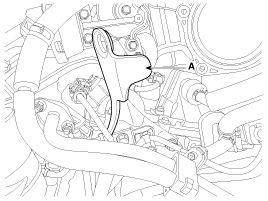
Disconnect the camshaft position sensor connector (A). |
| 4. |
Remove the mounting bolt, and then vertically remove the sensor from the cylinder head cover.
|
| [Bank 2/Intake] |
| 1. |
Turn the ignition switch OFF and disconnect the battery negative (-) terminal. |
| 2. |
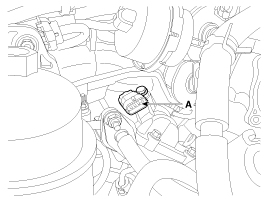
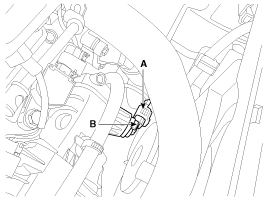
Disconnect the camshaft position sensor connector (A). |
| 3. |
Remove the mounting bolt, and then vertically remove the sensor (B) from the cylinder head cover.
|
| [Bank 2/Exhaust] |
| 1. |
Turn the ignition switch OFF and disconnect the battery negative (-) terminal. |
| 2. |
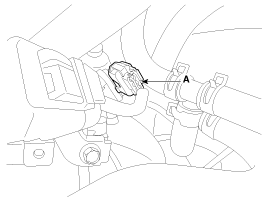
Disconnect the camshaft position sensor connector (A). |
| 3. |
Remove the mounting bolt, and then vertically remove the sensor (B) from the cylinder head cover.
|
| Installation |
|

| 1. |
Install in the reverse order of removal.
|
 Camshaft Position Sensor (CMPS) Schematic Diagrams
Circuit Diagram
...
 Camshaft Position Sensor (CMPS) Troubleshooting
Wave Form
...
Other Information:
External AMP Components and Components Location
Components
Connector Pin Information
No.Connector ANo.Connector B1Left front door (+)1Center front (+)2Right front door (+)2-3Left side door (+)3-4Right side door (+)4-5Subwoofer 2 (+)5Navi (+)6 ...
Radial-ply tires
Radial-ply tires provide improved tread life, road hazard resistance and smoother
high speed ride. The radial- ply tires used on this vehicle are of belted construction,
and are selected to comple ...
Categories
- Home
- First Generation
- Second Generation
- Third generation
- Kia Sedona YP 2014-2026 Owners Manual
- Kia Sedona YP 2014-2026 Service Manual

Copyright © www.kisedona.com 2016-2026