
 Kia Sedona: AC Inverter Unit Repair procedures
Third generation YP (2014-2026) / Kia Sedona YP Service Manual / Body Electrical System / AC Inverter System / AC Inverter Unit Repair procedures
| Removal |
| 1. |
Disconnect the negative (-) battery terminal. |
| 2. |
Remove the rear console assembly.
(Refer to Body - "Floor Console Assembly") |
| 3. |
Disconnect the AC inverter unit connector (A).
|
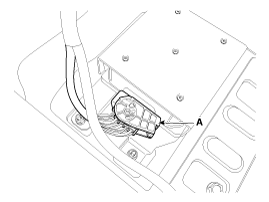
| 4. |
Remove the AC inverter unit (A) after loosening the nuts.
|
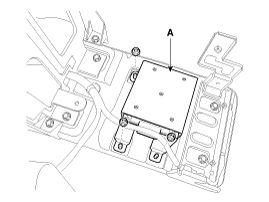
| Installation |
| 1. |
Install the AC inverter unit. |
| 2. |
Connect the AC inverter unit connector. |
| 3. |
Install the rear console assmbly. |
| 4. |
Connect the negative (-) battery terminal.
|

 AC Inverter Unit Schematic Diagrams
Circuit Diagram
...
 AC Inverter Outlet Repair procedures
Removal
[Outlet 1 - Console]
1.
Disconnect the negative (-) battery terminal.
2.
Remove the rear console cover.
(Refer to Body - "Rear Console Cover")
3.
Remove the floor console tray (A ...
Other Information:
Description and Operation
Description
The smart cruise control system allows a driver to program
the vehicle to control the speed and following distance by detecting the
vehicle ahead without depressing the brake pedal ...
Electrochromic mirror with HomeLink system
To operate the electric rearview mirror
Press the I button (1) to turn the automatic- dimming function on. The mirror
indicator light will illuminate.
Press the O button (2) to turn the automati ...
Categories
- Home
- First Generation
- Second Generation
- Third generation
- Kia Sedona YP 2014-2026 Owners Manual
- Kia Sedona YP 2014-2026 Service Manual

Copyright © www.kisedona.com 2016-2026