 Kia Sedona: Tail Gate Back Panel Repair procedures
Third generation YP (2014-2026) / Kia Sedona YP Service Manual / Body (Interior and Exterior) / Tail Gate / Tail Gate Back Panel Repair procedures
| Replacement |
Put on gloves to protect your hands. |

|

| 1. |
Remove the tail gate trim.
(Refer to Tail Gate - "Tail Gate Trim") |
| 2. |
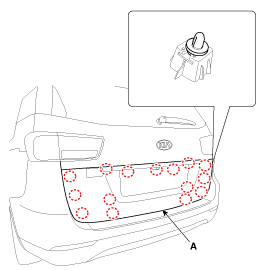
Disconnect the license lamp connector and back view camera connector (A).
|

| 3. |
Loosen the tail gate back panel mounting nuts (A).
|

| 4. |
Using a screwdriver or remover, remove the tail gate back panel (A).
|
| 5. |
Install in the reverse order of removal.
|

 Tail Gate Back Panel Components and Components Location
Component Location
1. Tail gate back panel
...
 Tail Gate Lift Repair procedures
Replacement
Take care to not let the tailgate fall on you as the lifts
are removed. Have a helper hold the tailgate open, or use a secure
method to hold it open.
...
Other Information:
Glove box
The glove box can be locked and unlocked with a master key. (if equipped)
To open the glove box, pull the handle and the glove box will automatically open.
Close the glove box after use.
WAR ...
Special Service Tools
Special Service Tools
Tool Name / NumberIllustrationDescriptionBand installer09495-3K000Installation of ear type boot bandBall joint puller09568-4A000Remove the ball jointPuller09495-33000Removal ...
Categories
- Home
- First Generation
- Second Generation
- Third generation
- Kia Sedona YP 2014-2026 Owners Manual
- Kia Sedona YP 2014-2026 Service Manual

Copyright © www.kisedona.com 2016-2026