
 Kia Sedona: Fuel Pump Repair procedures
Third generation YP (2014-2026) / Kia Sedona YP Service Manual / Engine Control / Fuel System / Fuel Delivery System / Fuel Pump Repair procedures
| Inspection |
[Fuel pump]
| 1. |
Turn the ignition switch OFF, and then remove battery (-) terminal. |
| 2. |
Remove the fuel pump assembly.
(Refer to Fuel Pump - "Removal") |
| 3. |
Check that motor operates properly when battery voltage is applied to terminals 4 and 5 of fuel pump connector (A).
|
[Fuel sender]
| 1. |
Turn the ignition switch OFF, and then remove battery (-) terminal. |
| 2. |
Remove the fuel pump assembly.
(Refer to Fuel Pump - "Removal") |
| 3. |
Using an ohmmeter, measure the resistance between terminals 1 and 3 of sender connector (A) at each float level.
|
| 4. |
Also check that the resistance changes smoothly when the float is moved from "E" to "F".
|
| Removal |
| 1. |
Release the residual pressure in fuel line.
(Refer to the Fuel Delivery System - Repair Procedures - "Release Residual Pressure in Fuel Line") |
| 2. |
Turn the ignition switch OFF and disconnect the negative (-) battery terminal. |
| 3. |
Remove the second row seat LH
(Refer to Body - "Rear Seat Assembly") |
| 4. |
Open the floor mat (A).
|
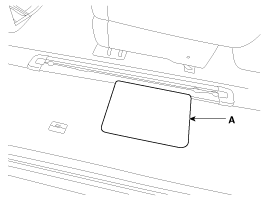
| 5. |
Remove the fuel pump service cover (A
|
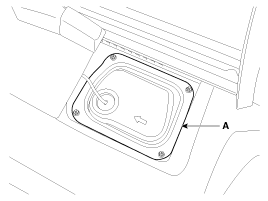
| 6. |
Disconnect the fuel pump connector (A), fuel tank pressure sensor (B) and fuel feed tube quick-connector (C).
|
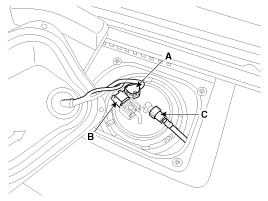
| 7. |
Remove the fuel pump plate cover (B) by using the special service tool (A) [SST NO.:09310-B8100].
|
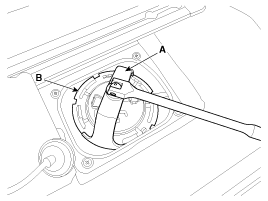
| 8. |
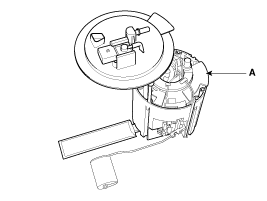
Remove the fuel pump (A).
|
| Installation |
| 1. |
Install in the reverse order of removal.
|

 Fuel Tank Repair procedures
Removal
1.
Release the residual pressure in fuel line.
(Refer to the Fuel Delivery System - Repair Procedures - "Release Residual Pressure in Fuel Line")
2.
Turn the ignition switch OFF and ...
 Fuel Filter Repair procedures
Removal
1.
Remove the fuel pump.
(Refer to Fuel Delivery System - “Fuel Pump”)
2.
Disconnect the fuel sender connector (A) and fuel pump connector (B).
3.
Remove the cushion pipe fixi ...
Other Information:
Description and Operation
Description
Back view camera will activate when the backup light is ON with the ignition switch ON and the shift lever in the R position.
This supplemental system shows the back of the vehicle on ...
Shift Lever Components and Components Location
Components
1. Shift lever2. Shift lever bracket3. Main shaft4. Manual mode switch housing5. Shift lock solenoid6. Key interlock switch7. Main connector8. Shift cable assembly9. Shift cable retain ...
Categories
- Home
- First Generation
- Second Generation
- Third generation
- Kia Sedona YP 2014-2026 Owners Manual
- Kia Sedona YP 2014-2026 Service Manual

Copyright © www.kisedona.com 2016-2026