 Kia Sedona: Repair procedures
Third generation YP (2014-2025) / Kia Sedona YP Service Manual / Body Electrical System / Keyless Entry And Burglar Alarm / Repair procedures
| Inspection |
Special care is needed for the following points in case of working with the non-gloss timber trimming.
|

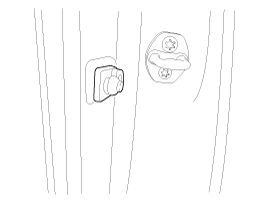
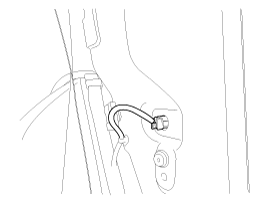
Front Door Lock Actuator Inspection
| 1. |
Remove the front door trim.
(Refer to Body - "Front Door Trim") |
| 2. |
Remove the front door module.
(Refer to Body - "Front Door Module") |
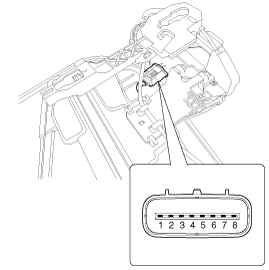
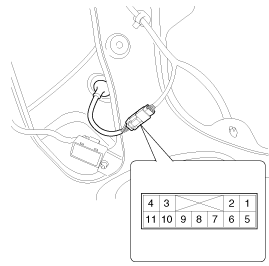
| 3. |
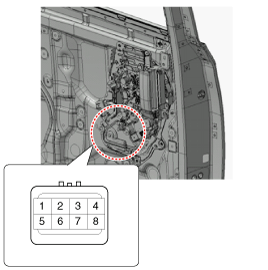
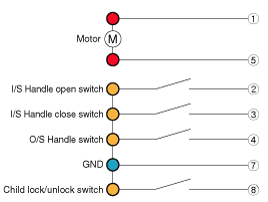
Disconnect the connector from the actuator.
| |||||||||||||||||||||||||||||
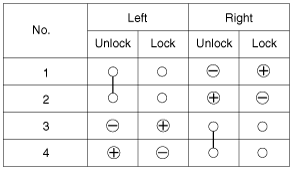
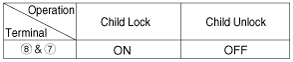
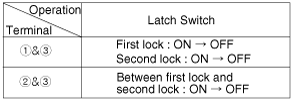
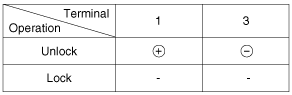
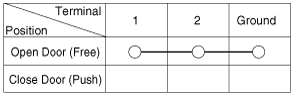
| 4. |
Check actuator operation by connecting power and ground
according to the table. To prevent damage to the actuator, apply battery
voltage only momentarily.
|
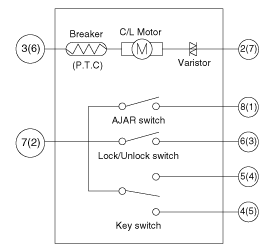
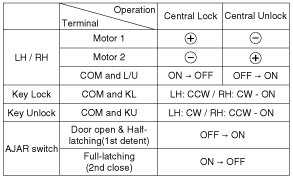
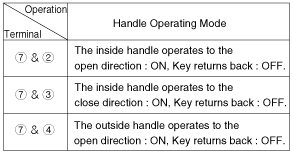
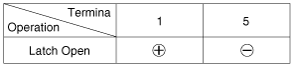
| 5. |
Check for continuity between terminals in half latching condition according to the table.
|

Rear Door Lock Actuator Inspection (Power Sliding Door Only)
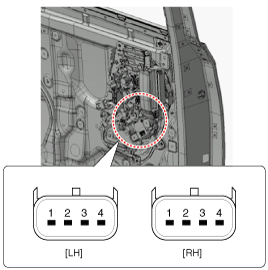
| 1. |
Remove the rear door trim.
(Refer to Body - "Rear Door Trim") |
| 2. |
Disconnect the connector from the actuator.
|
| 3. |
Check actuator operation by connecting power and ground
according to the table. To prevent damage to the actuator, apply battery
voltage only momentarily.
|

| 4. |
Check for continuity between terminals in half latching condition according to the table.
|
Rear Door Unlock Latch Actuator Inspection
| 1. |
Remove the rear door trim.
(Refer to Body - "Rear Door Trim") |
| 2. |
Disconnect the connector from the actuator.
|
| 3. |
Check actuator operation by connecting power and ground
according to the table. To prevent damage to the actuator, apply battery
voltage only momentarily.
|
| 4. |
Check for continuity between terminals in half latching condition according to the table.
|
Rear Door Lock Latch Inspection
| 1. |
Remove the rear door trim.
(Refer to Body - "Rear Door Trim") |
| 2. |
Remove the rear door screen. |
| 3. |
Disconnect the connector from the door latch.
|
| 4. |
Check actuator operation by connecting power and ground
according to the table. To prevent damage to the actuator, apply battery
voltage only momentarily.
|
| 5. |
Check for continuity between terminals in half latching condition according to the table.
|
Tailgate Lock Module Inspection
| 1. |
Remove the tailgate trim.
(Refer to Body - "Tailgate Trim") |
| 2. |
Disconnect the connector from the tailgate latch.
[Latch]
[SCA]
|

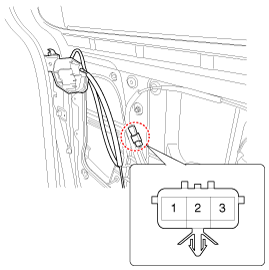
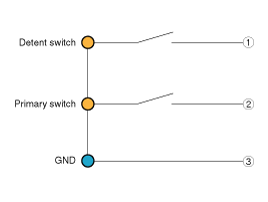
Tailgate Open Switch Inspection
| 1. |
Remove the tailgate trim.
(Refer to Body - "Tailgate Trim") |
| 2. |
Disconnect the connector from the tailgate open switch.
|
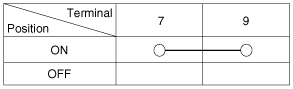
| 3. |
Check for continuity between the terminals and ground according to the table.
|
Door Switch Inspection
| 1. |
Remove the luggage side trim.
(Refer to Body - "Luggage Side Trim") |
| 2. |
Check for continuity between the terminals and ground according to the table.
|
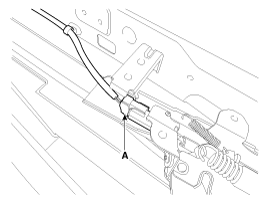
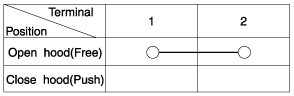
Hood Switch Inspection
| 1. |
Remove the hood latch assembly.
(Refer to Body - "Hood Latch Assembly") |
| 2. |
Disconnect the connector (A) from the hood switch.
|
| 3. |
Check for continuity between the terminals and ground according to the table.
|
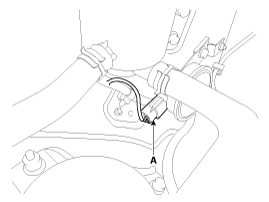
Burglar Horn Inspection
| 1. |
Disconnect the burglar horn connector (A).
|
| 2. |
Remove the burglar horn (A) after loosening the mounting nut.
|
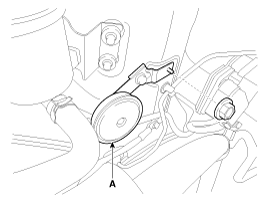
| 3. |
Test the burglar horn by connecting the battery power to terminal 1 and ground to terminal 2. |
| 4. |
The burglar horn should sound. If the burglar horn fails to sound, replace it. |
 Description and Operation
Description
Burglar Alarm State [B/A State]
B/A StateDescriptionDISARM
1)
In "DISARM" state, vehicle start inhibition is disabled. So,
when door, hood, or tailgate is opened, there is no ala ...
 Transmitter Repair procedures
Inspection
1.
Check that the red light flickers when the door lock or unlock button is pressed on the transmitter.
2.
Remove the battery (A) and check voltage if the red light doesn''t flicker ...
Other Information:
Oil Level Gauge & Pipe Components and Components Location
Components
1. Oil level gauge2. Oil level gauge pipe3. O-ring
...
Radiator Repair procedures
Removal and Installation
1.
Disconnect the battery negative terminal.
2.
Remove the engine room under cover.
(Refer to Engine And Transaxle Assembly - "Engine Room Under Cover")
3.
Drain ...
Categories
- Home
- First Generation
- Second Generation
- Third generation
- Kia Sedona YP 2014-2025 Owners Manual
- Kia Sedona YP 2014-2025 Service Manual
Copyright © www.kisedona.com 2016-2025