 Kia Sedona: Hood Latch Release Handle Repair procedures
Third generation YP (2014-2026) / Kia Sedona YP Service Manual / Body (Interior and Exterior) / Hood / Hood Latch Release Handle Repair procedures
| Replacement |
| 1. |
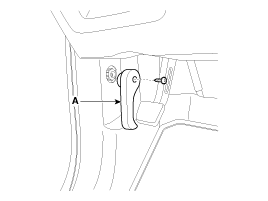
Using a screwdriver or remover, remove the hood release handle (A).
|

| 2. |
Install in the reverse order of removal.
|

 Hood Latch Release Handle Components and Components Location
Component Location
1. Hood latch release handle
...
 Hood Latch Components and Components Location
Component Location
1. Hood lower latch assembly
...
Other Information:
Luggage volume
...
Components and Components Location
Components Location
1. PCV Valve2. Canister3. Purge Control Solenoid Valve (PCSV)4. Fuel Tank Pressure Sensor (FTPS)5. Canister Close Valve (CCV)6. Fuel Level Sender (FLS)7. Fuel Tank Air Filt ...
Categories
- Home
- First Generation
- Second Generation
- Third generation
- Kia Sedona YP 2014-2026 Owners Manual
- Kia Sedona YP 2014-2026 Service Manual

Copyright © www.kisedona.com 2016-2026