 Kia Sedona: Brake Switch Repair procedures
Third generation YP (2014-2026) / Kia Sedona YP Service Manual / Brake System / Brake System / Brake Switch Repair procedures
| Removal |
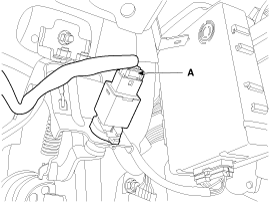
| 1. |
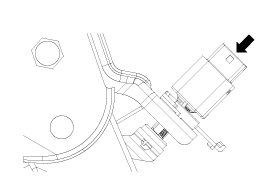
Disconnect the brake switch connector (A).
|
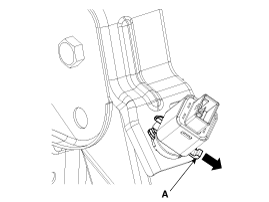
| 2. |
Pull the locking plate (A) as indicated by the arrow.
|
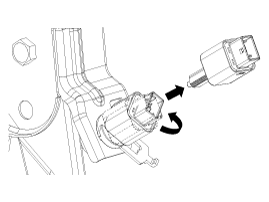
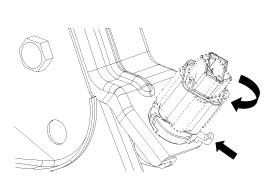
| 3. |
Turn brake switch 45° counterclockwise and remove it.
|
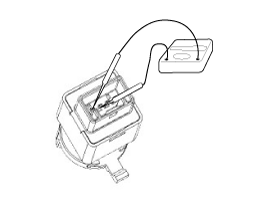
| Inspection |
| 1. |
Check the stop lamp switch.
|
| Installation |
| 1. |
Fix the brake pedal arm and insert fully the brake switch so that the contact part is invisible.
|
| 2. |
After inserting, turn the brake switch 45° clockwise, and then assemble locking plate by pushing.
|
| 3. |
Confirm the gap between brake switch and bracket.
|

| 4. |
Connect the brake switch connector (A).
|
| Adjustment |
| Brake switch clearance adjustment |
If the gap between brake switch and bracket is not 1.0 - 2.0 mm (0.04 - 0.08 in.), follow the procedure below:
| 1. |
Disconnect the brake switch connector (B).
|
| 2. |
Pull the locking plate (A) as indicated by the arrow.
|
| 3. |
Turn brake switch 45° counterclockwise and remove it.
|
| 4. |
Fix the brake pedal arm and insert fully the brake switch so that the contact part is invisible.
|
| 5. |
After inserting, turn the brake switch 45° clockwise, and then assemble locking plate by pushing.
|
| 6. |
Confirm the gap between brake switch and bracket.
|
| 7. |
Connect the brake switch connector (A).
|
 Brake Pedal Repair procedures
Removal
1.
Turn ignition switch OFF and disconnect the negative (-) battery cable.
2.
Remove the crash pad lower panel and reinforcing panel. (Refer to the Body group- crash pad).
3.
Remov ...
 Front Disc Brake Components and Components Location
Components
1. Guide rod bolt2. Bleed screw3. Caliper carrier4. Caliper body5. Inner pad shim6. Brake pad7. Pad retainer
...
Other Information:
Specifications
Specifications
Audio Head Unit
ItemSpecificationModelRADIO/USB(iPod)/SDARS (PA30A)RADIO/USB(iPod)/SDARS (PA30B, UVO)Internal AmplifierExternal AmplifierPower supplyDC 14.4 V Negative groundOutpu ...
IMS (Integrated Memory System) module Components and Components Location
Components
Connector Pin Information
No.Connecter AConnecter BConnecter CConnecter D1-Batt (+)--2Front tilt motor (Up)GND-Seat rear height sensor3Rear height motor (Up)Batt (+)Slide switch signa ...
Categories
- Home
- First Generation
- Second Generation
- Third generation
- Kia Sedona YP 2014-2026 Owners Manual
- Kia Sedona YP 2014-2026 Service Manual

Copyright © www.kisedona.com 2016-2026