 Kia Sedona: Brake Pedal Repair procedures
Third generation YP (2014-2026) / Kia Sedona YP Service Manual / Brake System / Brake System / Brake Pedal Repair procedures
| Removal |
| 1. |
Turn ignition switch OFF and disconnect the negative (-) battery cable. |
| 2. |
Remove the crash pad lower panel and reinforcing panel. (Refer to the Body group- crash pad). |
| 3. |
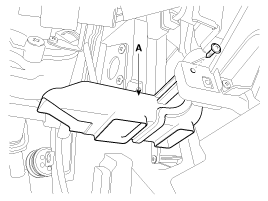
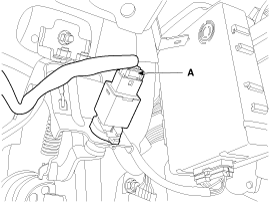
Remove the shower duct (A).
|
| 4. |
Pull down steering column shaft after removing bolts and nuts. (Refer to the steering group - Steering columm & shaft) |
| 5. |
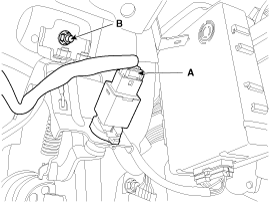
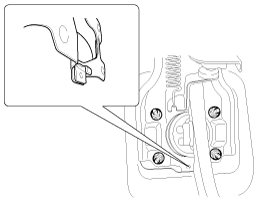
Disconnect the brake switch connector (A).
|
| 6. |
Remove the brake pedal member mounting nut (B). |
| 7. |
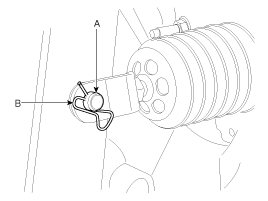
Remove the snap pin (A) and clevis pin (B).
|
| 8. |
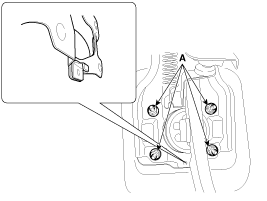
Remove the brake pedal member assembly mounting nuts (A) and then remove the brake pedal assembly.
|

| Inspection |
| 1. |
Check the bushing for wear. |
| 2. |
Check the brake pedal for bending or twisting. |
| 3. |
Check the brake pedal return spring for damage. |
| Installation |
| 1. |
Install the brake pedal assembly in dash panel.
|
| 2. |
Pre-tighten the bracket fixing bolt(B) in dash panel.
|

| 3. |
Install the brake booster and brake pedal member fixing nut (A) securely.
|
| 4. |
Tighten the bolt (B) securely in dash panel.
|
| 5. |
Install the snap pin (A) and clevis pin (B).
|

| 6. |
Install the brake switch securely. |
| 7. |
Connect the brake switch connector (A).
|
| 8. |
Adjust the brake pedal height and free play. |
| 9. |
Check the brake pedal operation after installing the brake pedal. |
| 10. |
Install the steering column shaft assembly. |
| 11. |
Install the shower duct (A).
|
| 12. |
Install the reinforcing panel and crash pad lower panel. |
| 13. |
Reconnect the battery negative cable. |
 Brake Pedal Components and Components Location
Components
1. Cowl bracket2. Brake pedal member assembly3. Brake switch4. Return spring5. Brake pedal stopper6. Clevis pin7. Snap pin8. Brake pedal
...
 Brake Switch Repair procedures
Removal
1.
Disconnect the brake switch connector (A).
2.
Pull the locking plate (A) as indicated by the arrow.
3.
Turn brake switch 45° counterclockwise and remove it.
Inspection
1.
...
Other Information:
Repair procedures
Inspection
Special care is needed for the following points in case of working with the non-gloss timber trimming.
•
Wrap a protective tape around tools used ...
Air intake control
Type A
The air intake control is used to select the outside (fresh) air position or
recirculated air position.
To change the air intake control position, press the control button.
Recirculated ...
Categories
- Home
- First Generation
- Second Generation
- Third generation
- Kia Sedona YP 2014-2026 Owners Manual
- Kia Sedona YP 2014-2026 Service Manual

Copyright © www.kisedona.com 2016-2026