 Kia Sedona: A/C Pressure Transducer Repair procedures
Third generation YP (2014-2026) / Kia Sedona YP Service Manual / Heating,Ventilation And Air Conditioning / Air conditioning System / A/C Pressure Transducer Repair procedures
| Inspection |
| 1. |
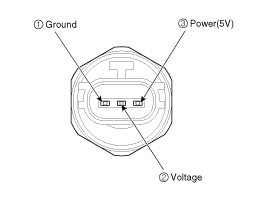
Measure the pressure of high pressure line by measuring voltage output between terminals “1” and “2”.
|
| 2. |
Inspect the voltage value to determine whether it is within specification.
|
| 3. |
If the measured voltage value is not wihtin specification, replace the A/C pressure transducer.
|
| Replacement |
| 1. |
Disconnect the negative (-) battery terminal. |
| 2. |
Recover the refrigerant with a recovery/charging station. |
| 3. |
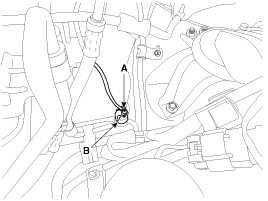
Disconnect the A/C pressure transducer connector (A). |
| 4. |
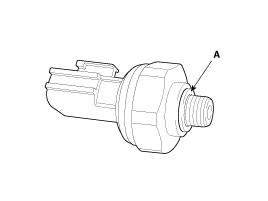
Remove the A/C pressure transducer (B).
|

| 5. |
Install in the reverse order of removal.
|

 A/C Pressure Transducer Description and Operation
Description
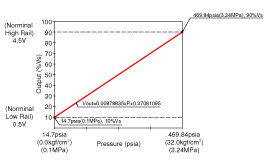
The A/C Pressure Transducer (APT) converts the pressure value
of high pressure line into voltage value after measuring it. By
converted voltage value, engine ECU controls the coolin ...
 Evaporator Temperature Sensor Description and Operation
Description
The evaporator temperature sensor detects the evaporator core
temperature and interrupt compressor relay power in order to prevent
evaporator from freezing by excessive cooling. ...
Other Information:
Keep your garage dry
Don't park your vehicle in a damp, poorly ventilated garage. This creates a favorable
environment for corrosion. This is particularly true if you wash your vehicle in
the garage or drive it in ...
Description and Operation
Description
AVN system
The AVN system provides improved search function and easy
access for drivers by offering simplified system operation experience
and integrated display for multimedia and ...
Categories
- Home
- First Generation
- Second Generation
- Third generation
- Kia Sedona YP 2014-2026 Owners Manual
- Kia Sedona YP 2014-2026 Service Manual

Copyright © www.kisedona.com 2016-2026