 Kia Sedona: Tail Gate Latch Repair procedures
Third generation YP (2014-2026) / Kia Sedona YP Service Manual / Body (Interior and Exterior) / Tail Gate / Tail Gate Latch Repair procedures
| Replacement |
Put on gloves to protect your hands. |

|

| 1. |
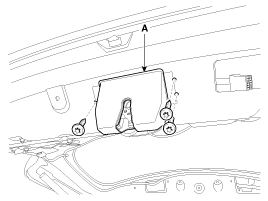
Remove the tail gate trim.
(Refer to Tail Gate - "Tail Gate Trim") |
| 2. |
Disconnect the tail gate latch connector (A). |
| 3. |
Disconnect the tail gate motor connector (B) after loosening the nuts.
|
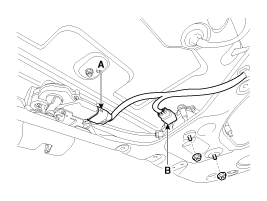
| 4. |
Loosen the torx driver and remove the tail gate latch assembly (A).
|
| 5. |
Install in the reverse order of removal.
|
 Tail Gate Latch Components and Components Location
Component Location
1. Tail gate latch assembly
...
 Tail Gate Back Panel Components and Components Location
Component Location
1. Tail gate back panel
...
Other Information:
Normal maintenance schedule
The following maintenance services must be performed to ensure good emission
control and performance. Keep receipts for all vehicle emission services to protect
your warranty. Where both mileage a ...
Rear Door Window Glass Components and Components Location
Component Location
1. Rear door window glass
...
Categories
- Home
- First Generation
- Second Generation
- Third generation
- Kia Sedona YP 2014-2026 Owners Manual
- Kia Sedona YP 2014-2026 Service Manual

Copyright © www.kisedona.com 2016-2026