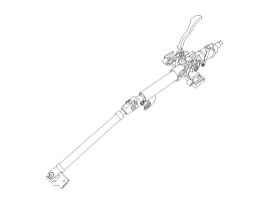
 Kia Sedona: Steering Column and Shaft Repair procedures
Third generation YP (2014-2026) / Kia Sedona YP Service Manual / Steering System / Electric Power Steering / Steering Column and Shaft Repair procedures
| Removal |
| 1. |
Disconnect the battery negative cable from the battery and then wait for at least 30 seconds. |
| 2. |
Turn the steering wheel so that the front wheels can face straight ahead. |
| 3. |
Remove the airbag module.
(Refer to Restraint - "Driver Airbag (DAB) Module and Clock Spring") |
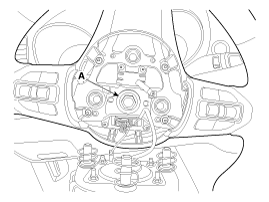
| 4. |
Disconnect the connector & lock nut (A) and then remove the steering wheel by using special service tools (09561-11001).
|

| 5. |
Remove the steering column shroud.
(Refer to Restraint - "Driver Airbag (DAB) Module and Clock Spring") |
| 6. |
Remove the clock spring.
(Refer to Restraint - "Driver Airbag (DAB) Module and Clock Spring") |
| 7. |
Remove the multifunction switch.
(Refer to Body Electrical System - "Multifunction switch") |
| 8. |
Remove the crash pad lower panel.
(Refer to Body (Interior and Exterior) - "Crash Pad Lower Panel") |
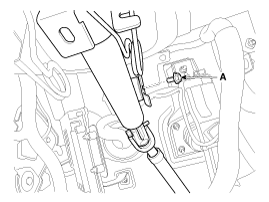
| 9. |
Loosen the bolt (A) and then disconnect the universal joint assembly from the pinion of the steering gear box.
|
| 10. |
Loosen 4 bolts (A) and then remove the nick bolster panel (B).
|

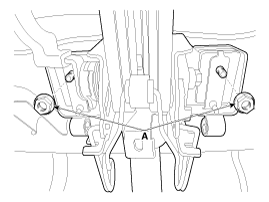
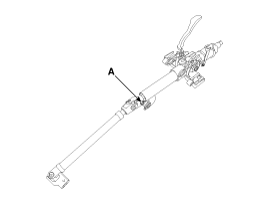
| 11. |
Remove 2 nuts (A) from the steering column shaft assembly.
|
| 12. |
Remove the brake switch.
(Refer to Brake System - "Brake Switch") |
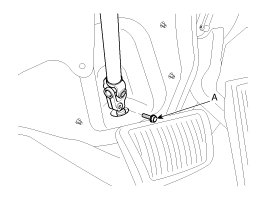
| 13. |
Remove the bolt (A) from the steering column shaft assembly.
|
| 14. |
Remove the steering column assembly.
|
| 15. |
Install in the reverse order of removal. |
| 16. |
Perform the steering angle sensor calibration.
|
| Disassembly |
Universal joint assembly
| 1. |
Loosen the bolt (A) and then disconnect the universal joint assembly from the steering column assembly.
|
| 2. |
Reassemble in the reverse order of disassembly. |
| Inspection |
| 1. |
Check the steering column for damage and deformation. |
| 2. |
Check the joint bearing for damage and wear. |
| 3. |
Check the tilt bracket for damage and cracks. |
| 4. |
Check the key lock assembly for proper operation and replace it if necessary. |
 Schematic Diagrams
Circuit Diagram
1.
Connector terminal
TypePin NoDescriptionBattery1Battery -2Battery +Vehicle1-2-3-4-5-6-7IGN8High_CAN9Low_CAN10-11-12-
2.
Circuit Diagram ...
 Steering Gear box Repair procedures
Removal
1.
Remove the front wheel and tire (A) from front hub.
Tightening torque :
88.2 ~ 107.8 N.m (9.0 ~ 11.0 kgf.m, 65.0 ~ 79.5 lb-ft)
•
Be careful ...
Other Information:
Weight of the trailer
What is the maximum safe weight of a trailer? It should never weigh more than
the maximum trailer weight with trailer brakes. But even that can be too heavy.
It depends on how you plan to use you ...
Description and Operation
Description of ESC
Electronic Stability Control (ESC) recognizes critical
driving conditions, such as panic reactions in dangerous situations, and
stabilizes the vehicle by wheel-individual bra ...
Categories
- Home
- First Generation
- Second Generation
- Third generation
- Kia Sedona YP 2014-2026 Owners Manual
- Kia Sedona YP 2014-2026 Service Manual

Copyright © www.kisedona.com 2016-2026