
 Kia Sedona: Seat Heater Schematic Diagrams
Third generation YP (2014-2026) / Kia Sedona YP Service Manual / Body Electrical System / Seat Electrical / Seat Heater Schematic Diagrams
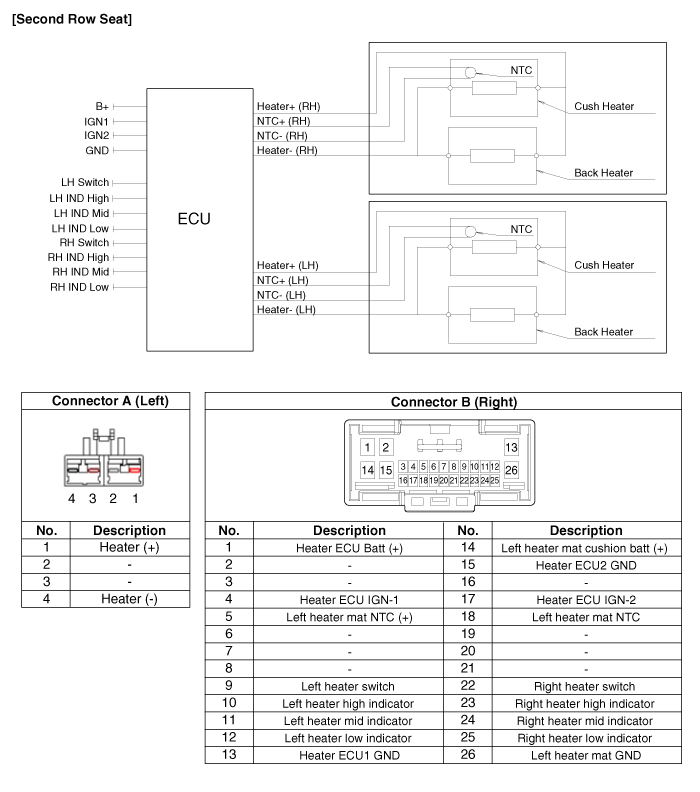
| Circuit Diagram |
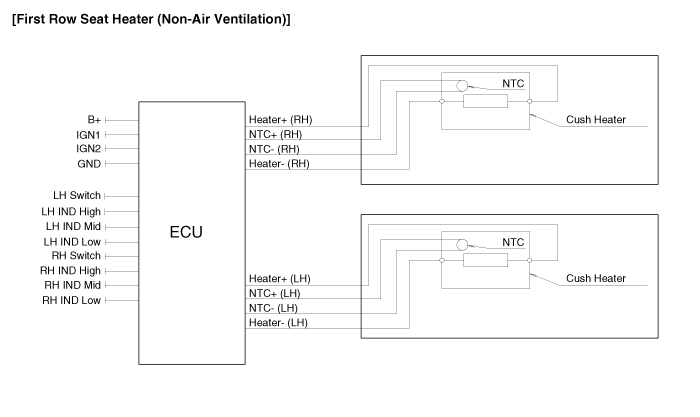
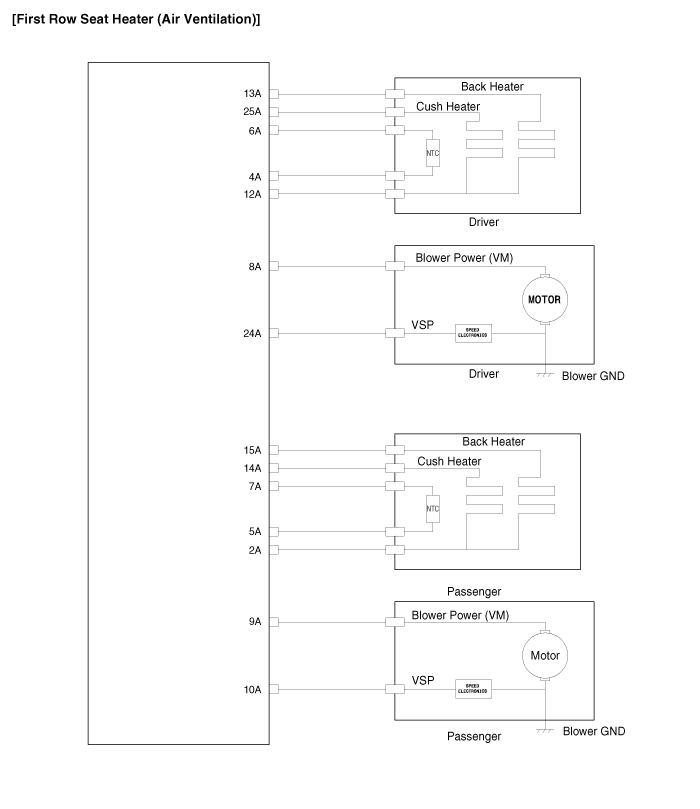

Connector Pin Information
| No. | Description | No. | Description |
| 1 | Power Seat Batt (+) | 18 | Left NTC (+) |
| 2 | Left air ventilation/heater cushion batt (+) | 19 | Air ventilation/heater ECU batt (+) |
| 3 | Left air ventilation/heater back batt (+) | 20 | Left blower speed |
| 4 | Left blower power batt (+) | 21 | - |
| 5 | Left heater switch | 22 | Right heater switch |
| 6 | Left heater high indicator | 23 | Right heater high indicator |
| 7 | Left heater mid indicator | 24 | Right heater mid indicator |
| 8 | Left heater low indicator | 25 | Right heater low indicator |
| 9 | Left air ventilation switch | 26 | Right air ventilation switch |
| 10 | Left air ventilation high indicator | 27 | Right air ventilation high indicator |
| 11 | Left air ventilation mid indicator | 28 | Right air ventilation mid indicator |
| 12 | Left air ventilation low indicator | 29 | Right air ventilation low indicator |
| 13 | Air ventilation/heater ECU IGN2 | 30 | Spare |
| 14 | Air ventilation/heater ECU GND | 31 | Heater ECU2 GND |
| 15 | Left NTC | 32 | Left air ventilation/heater mat GND |
| 16 | Power seat GND | 33 | Right blower GND |
| 17 | Air ventilation/heater ECU IGN1 | 34 | Left blower GND |
 Seat Heater Components and Components Location
Components
...
 Seat Heater Repair procedures
Inspection
First Row Seat Heater
1.
Check for continuity and measure the resistance between terminals No 3 and No 6.
Standard value
Driver / Assists (cushion) : 3.23Ω±10%
Driver / Assist ...
Other Information:
Left power sliding door opening or closing
When the power door ON/OFF button is ON (not depressed) :
The left sliding door is opened or closed automatically if the button is pressed
and held.
When the left sliding door is closed and more t ...
Horn
To sound the horn, press the horn symbols on your steering wheel. Check the horn
regularly to be sure it operates properly.
✽ NOTICE
To sound the horn, press the area indicated by the hor ...
Categories
- Home
- First Generation
- Second Generation
- Third generation
- Kia Sedona YP 2014-2026 Owners Manual
- Kia Sedona YP 2014-2026 Service Manual

Copyright © www.kisedona.com 2016-2026