 Kia Sedona: Repair procedures
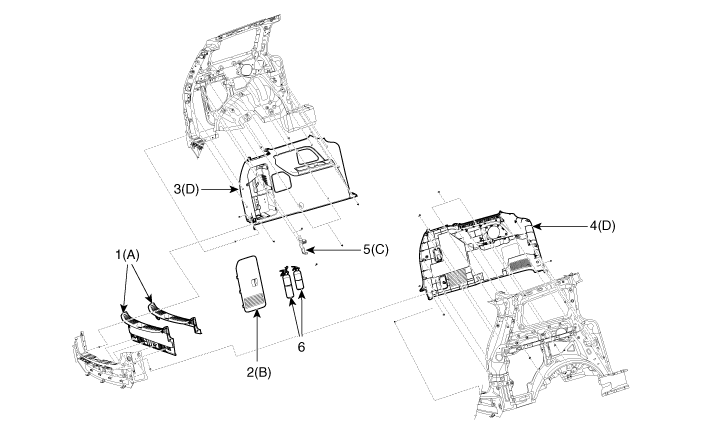
Third generation YP (2014-2026) / Kia Sedona YP Service Manual / Body (Interior and Exterior) / Trunk Trim / Repair procedures
| Replacement |
|

Take care not to bend or scratch the trim and panels. |

| 1. |
Remove the second row seat assembly.
(Refer to Rear Seat - "Rear Seat Assembly") |
| 2. |
Remove the third row seat assembly.
(Refer to Rear Seat - "Rear Seat Assembly") |
| 3. |
Remove the fourth row seat assembly.
(Refer to Rear Seat - "Rear Seat Assembly") |
| 4. |
Remove the rear door scuff trim.
(Refer to Interior Trim - "Door Scuff Trim") |
| 5. |
Remove the tailgate piller trim.
(Refer to Interior Trim - "Rear Piller Trim") |
| 6. |
Remove the rear transverse trim (A) using the screwdrive or remover. |
| 7. |
Remove the fire extinguisher cover (B). |
| 8. |
Remove the fire extinguisher bracket (C) after loosening the bolts. |
| 9. |
Remove the luggage side trim (D) after loosening the mounting screws and bolts. |
| 10. |
Install in the reverse order of removal.
|

 Trunk Trim
...
 Windshield Glass
...
Other Information:
SS-B Solenoid Valve(ON/OFF) Description and Operation
Description
•
SS-B solenoid valve is ON/OFF type.
•
When TCM supplies power to solenoid valve, speed range is changed by operating the solenoid valve.
SS-B Solenoid Valve op ...
Components and Components Location
Component Location
1. Windshield wiper arm & blade2. Wiper & washer switch3. Windshield washer hose & nolzzle4. Washer reservoir5. Washer motor6. Washer fluid level sensor7. Wiper mot ...
Categories
- Home
- First Generation
- Second Generation
- Third generation
- Kia Sedona YP 2014-2026 Owners Manual
- Kia Sedona YP 2014-2026 Service Manual

Copyright © www.kisedona.com 2016-2026