
 Kia Sedona: Door Scuff Trim Repair procedures
Third generation YP (2014-2026) / Kia Sedona YP Service Manual / Body (Interior and Exterior) / Interior Trim / Door Scuff Trim Repair procedures
| Replacement |
|

Take care not to bend or scratch the trim and panels. |

| [Front] |
| 1. |
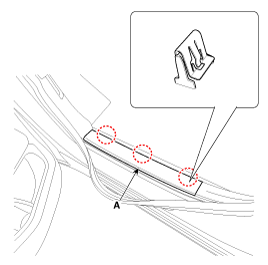
Using a screwdriver or remover, remove the front door scuff trim (A).
|
| 2. |
Install in the reverse order of removal.
|

| [Rear] |
| 1. |
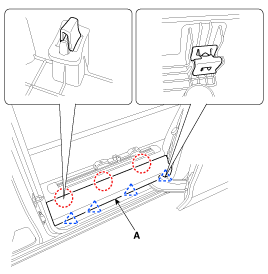
Using a screwdriver or remover, remove the rear door scuff trim (A).
|
| 2. |
Install in the reverse order of removal.
|
 Door Scuff Trim Components and Components Location
Component Location
1. Front door scuff trim2. Rear door scuff trim
...
 Cowl Side Trim Components and Components Location
Component Location
1. Cowl side trim
...
Other Information:
Windshield defrosting and defogging
WARNING - Windshield heating
Do not use the or
position during cooling operation
in extremely humid weather. The difference between the temperature of the outside
air and the windshield c ...
Console Armrest Repair procedures
Replacement
Put on gloves to protect your hands.
•
When prying with a flat-tip screwdriver, wrap it with
protective tape, an ...
Categories
- Home
- First Generation
- Second Generation
- Third generation
- Kia Sedona YP 2014-2026 Owners Manual
- Kia Sedona YP 2014-2026 Service Manual

Copyright © www.kisedona.com 2016-2026