 Kia Sedona: Tail Gate Lift Repair procedures
Third generation YP (2014-2026) / Kia Sedona YP Service Manual / Body (Interior and Exterior) / Tail Gate / Tail Gate Lift Repair procedures
| Replacement |
Take care to not let the tailgate fall on you as the lifts
are removed. Have a helper hold the tailgate open, or use a secure
method to hold it open. |
| 1. |
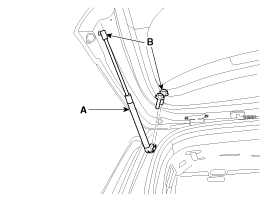
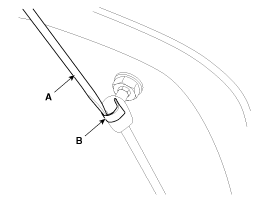
Remove the tail gate lifter (A) after loosening the bolts and socket clip and bolts (B).
|
| 2. |
Install in the reverse order of removal.
|
 Tail Gate Back Panel Repair procedures
Replacement
Put on gloves to protect your hands.
•
When prying with a flat-tip screwdriver, wrap it with
protective tape, an ...
 Tail Gate Weatherstrip Repair procedures
Replacement
1.
Remove the rear transverse trim.
(Refer to Interior Trim - "Rear Transverse Trim")
2.
Remove the tail gate weatherstrip (A).
Do not apply sealant ...
Other Information:
Rear Axle Repair procedures
Removal
1.
Remove the front wheel and tire (A) from front hub.
Tightening torque:
88.2 ~ 107.8 N.m (9.0 ~ 11.0 kgf.m, 65.0 ~ 79.5 lb-ft)
Be careful not to damag ...
Schematic Diagrams
Trouble Symptom Charts
Component Parts And Function Outline
Component partFunctionCruise Control SwitchInput the set speed and distance to the SCC ECU.Instrument ClusterDisplay various informati ...
Categories
- Home
- First Generation
- Second Generation
- Third generation
- Kia Sedona YP 2014-2026 Owners Manual
- Kia Sedona YP 2014-2026 Service Manual
Copyright © www.kisedona.com 2016-2026


