 Kia Sedona: Repair procedures
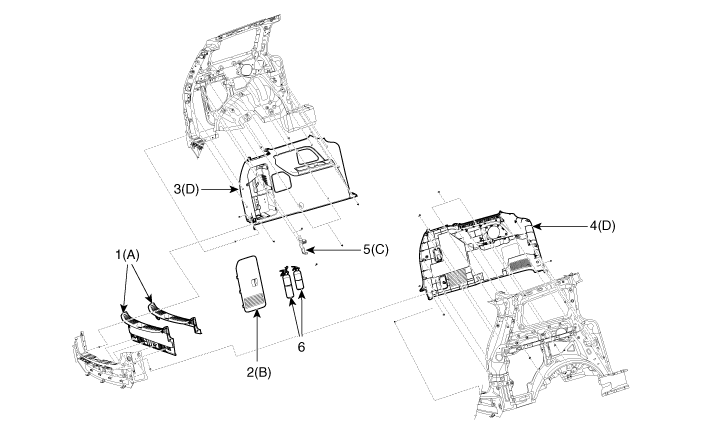
Third generation YP (2014-2026) / Kia Sedona YP Service Manual / Body (Interior and Exterior) / Trunk Trim / Repair procedures
| Replacement |
|

Take care not to bend or scratch the trim and panels. |

| 1. |
Remove the second row seat assembly.
(Refer to Rear Seat - "Rear Seat Assembly") |
| 2. |
Remove the third row seat assembly.
(Refer to Rear Seat - "Rear Seat Assembly") |
| 3. |
Remove the fourth row seat assembly.
(Refer to Rear Seat - "Rear Seat Assembly") |
| 4. |
Remove the rear door scuff trim.
(Refer to Interior Trim - "Door Scuff Trim") |
| 5. |
Remove the tailgate piller trim.
(Refer to Interior Trim - "Rear Piller Trim") |
| 6. |
Remove the rear transverse trim (A) using the screwdrive or remover. |
| 7. |
Remove the fire extinguisher cover (B). |
| 8. |
Remove the fire extinguisher bracket (C) after loosening the bolts. |
| 9. |
Remove the luggage side trim (D) after loosening the mounting screws and bolts. |
| 10. |
Install in the reverse order of removal.
|

 Trunk Trim
...
 Windshield Glass
...
Other Information:
Comfort mode
The steering wheel becomes lighter. The comfort mode is usually used when driving
in the city or when parking the vehicle.
For your safety, if you press the steering mode button while operatin ...
Daytime running light
Daytime Running Lights (DRL) can make it easier for others to see the front of
your vehicle during the day. DRL can be helpful in many different driving conditions,
and it is especially helpful af ...
Categories
- Home
- First Generation
- Second Generation
- Third generation
- Kia Sedona YP 2014-2026 Owners Manual
- Kia Sedona YP 2014-2026 Service Manual

Copyright © www.kisedona.com 2016-2026