 Kia Sedona: Head Lamps Repair procedures
Third generation YP (2014-2026) / Kia Sedona YP Service Manual / Body Electrical System / Lighting System / Head Lamps Repair procedures
| Removal |
Head lamps become very hot during use; do not touch them or attach any hardware immediately after turning them off. |

|

Head Lamp
| 1. |
Disconnect the negative (-) battery terminal. |
| 2. |
Remove the front bumper cover.
(Refer to Body - "Front Bumper Cover") |
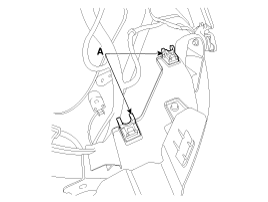
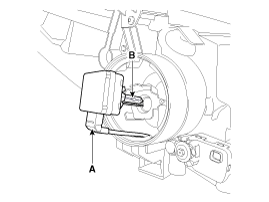
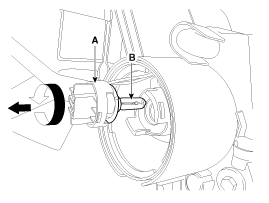
| 3. |
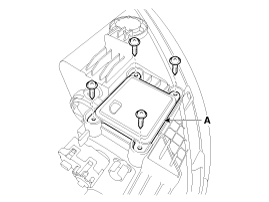
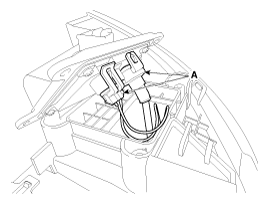
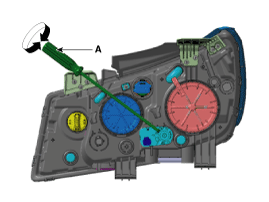
Disconnect the head lamp connector (A) and mounting clip (B).
|

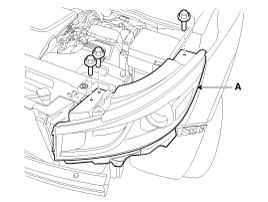
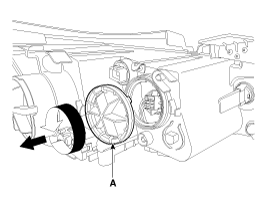
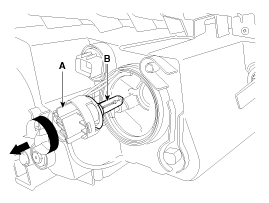
| 4. |
Remove the head lamp (A) after loosening the bolts.
|
| Installation |
| 1. |
Install the head lamp assembly. |
| 2. |
Connect the head lamp connector. |
| 3. |
Connect the negative (-) battery terminal. |
| Replacement |
Turn the head lamp switch off to avoid high voltage. |
|
Bulb (HID)
| 1. |
Remove the head lamp. |
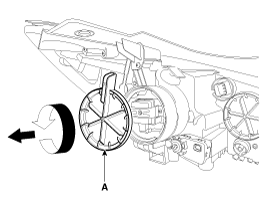
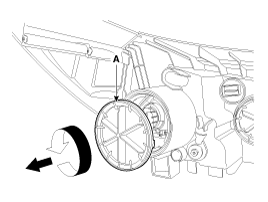
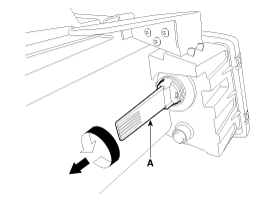
| 2. |
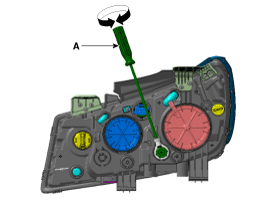
Remove the dust caps (A) from the head lamp assembly after turning in the counterclockwise direction.
|
| 3. |
Remove the bracket (A) after loosening the screws.
|
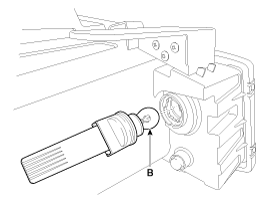
| 4. |
Remove the ignitor lamp (B) after disconnecting the connector (A).
|
| 5. |
Install in the reverse order of removal.
|
Bulb (high/low)
| 1. |
Remove the head lamp. |
| 2. |
Remove the dust caps (A) from the head lamp assembly after turning in the counterclockwise direction.
[LOW]
[HIGH]
|
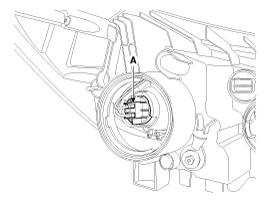
| 3. |
Disconnect the head lamp low beam bulb connector (A).
|
| 4. |
Remove the head lamp low beam bulb (B) after removing the socket (A) from the head lamp assembly.
|
| 5. |
Disconnect the head lamp high beam bulb connector (A).
|

| 6. |
Remove the head lamp high beam bulb (B) after removing the socket (A) from the head lamp assembly.
|
| 7. |
Install in the reverse order of removal. |
Turn Signal Lamp
| 1. |
Turn the head lamp switch off. |
| 2. |
Remove the bulb socket (A) and bulb (B) from the head lamp assembly.
|
| 3. |
Install in the reverse order of removal. |
Ballast
| 1. |
Remove the head lamp. |
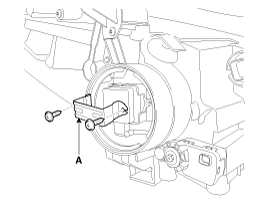
| 2. |
Remove the ballast (A) after loosening the screws.
|
| 3. |
Disconnect the connectors (A) from the ballast.
|
| 4. |
Install in the reverse order of removal.
|
| Inspection |
| 1. |
Check the battery voltage. (Low beam will be on when the battery voltage is above 9V.) |
| 2. |
Check the fuse and relay. |
| 3. |
Check the polarity of ballast. (If the polarity is changed, low beam does not light on.) |
| 4. |
Check that the bulb connector is connected securely. |
| 5. |
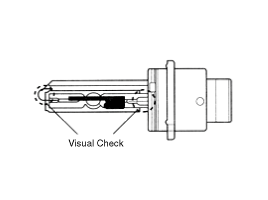
Visually check bulb (no filament) : damaged glass, damaged upper parts and lower parts of glass tube. |
| 6. |
After (1)~(5), replace the ballast and the ignitor. (ballast assembly).
|
Characteristic
| 1. |
Durable for vibration as there is no filament. |
| 2. |
HID lamps have longer lifetime than halogen lamps. |
| 3. |
Does not operate if polarity is changed. |
| 4. |
Operating input voltage : 9-16V |
| Head Lamp Aiming Instructions |
| [Mechanical aiming] |
The head lamps should be aimed with the proper beam-setting
equipment, and in accordance with the equipment manufacturer''s
instructions.
If there are any regulations pertinent to the aiming of head
lamps in the area where the vehicle is to be used, adjust so as to meet
those requirements. |
Alternately turn the adjusting gear to adjust the head lamp
aiming. If beam-setting equipment is not available, proceed as follows :
| 1. |
Inflate the tires to the specified pressure and remove any loads from the vehicle except the driver, spare tire, and tools. |
| 2. |
The vehicle should be placed on a level ground. |
| 3. |
Draw vertical lines (Vertical lines passing through
respective head lamp centers) and a horizontal line (Horizontal line
passing through center of head lamps) on the screen. |
| 4. |
With the head lamp and battery in normal condition, aim the head lamps so the brightest portion falls on the vertical lines.
A : Vertical
[Non Leveling Device]
[Leveling Device]
|
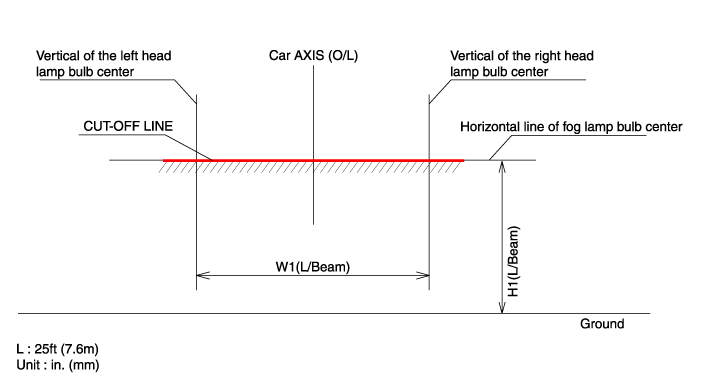
Head Lamp And Fog Lamp Aiming Point
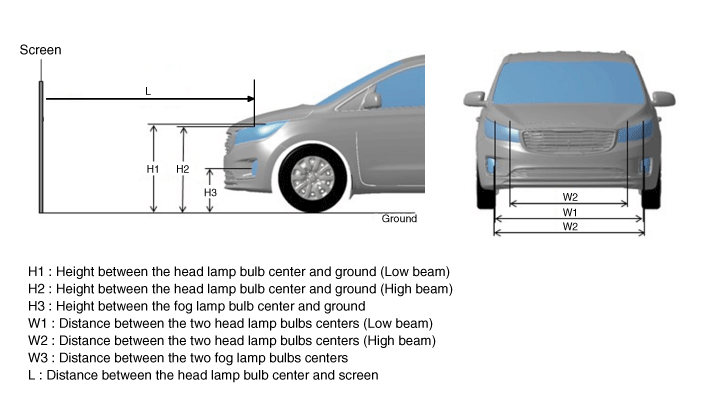

| 1. |
Head Lamp (Low beam)
|
Head lamp fogging
Check the below instruction procedure when the head lamp is fogged.

 Head Lamps Description and Operation
HID Head Lamp
1.
Bulb
(1)
Elements
Xenon gas: Xenon gas activates the initial reaction for rapid illuminating.
Molybdenum electrode: anode arcing
Metal halide salts: color composing component ...
 Turn Signal Lamp Repair procedures
Removal
Door Mirror Turn Signal Lamp
1.
Disconnect the negative (-) battery terminal.
2.
Remove the mirror (A) from the mirror holder.
Be careful not to damage t ...
Other Information:
Description and Operation
Description
Windshield deicer system prevents windshield wiper from
freezing in the winter season. It consists of deicer in the lower part
of windshield, switch and relay. Body control module r ...
Head Lamps Components and Components Location
Components
1. Low beam bulb2. Low beam bulb socket3. Dust cap (Low)4. High beam bulb5. High beam bulb socket6. Dust cap (High)7. Turn signal lamp bulb8. Turn signal lamp socket9. Side marker lamp ...
Categories
- Home
- First Generation
- Second Generation
- Third generation
- Kia Sedona YP 2014-2026 Owners Manual
- Kia Sedona YP 2014-2026 Service Manual

Copyright © www.kisedona.com 2016-2026