 Kia Sedona: Front Pillar Trim Repair procedures
Third generation YP (2014-2026) / Kia Sedona YP Service Manual / Body (Interior and Exterior) / Interior Trim / Front Pillar Trim Repair procedures
| Replacement |
|

Take care not to bend or scratch the trim and panels. |

| 1. |
Remove the front door body side weatherstrip. |
| 2. |
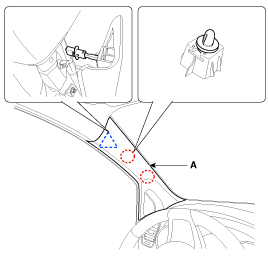
Remove the front pillar trim (A) using a screwdriver or remover.
|
| 3. |
Install in the reverse order of removal.
|

 Front Pillar Trim Components and Components Location
Component Location
1. Front pillar trim
...
 Center Pillar Trim Components and Components Location
Component Location
1. Center pillar lower trim2. Center pillar upper trim
...
Other Information:
Underdrive Brake Control Solenoid Valve(UD/B_VFS) Schematic Diagrams
Circuit Diagram
...
If the engine overheats
If your temperature gauge indicates overheating, you experience a loss of power,
or hear loud pinging or knocking, the engine will probably be too hot. If this happens,
you should:
1.Pull off the ...
Categories
- Home
- First Generation
- Second Generation
- Third generation
- Kia Sedona YP 2014-2026 Owners Manual
- Kia Sedona YP 2014-2026 Service Manual

Copyright © www.kisedona.com 2016-2026