 Kia Sedona: Exhaust Manifold Repair procedures
Third generation YP (2014-2026) / Kia Sedona YP Service Manual / Engine Mechanical System / Intake And Exhaust System / Exhaust Manifold Repair procedures
| Removal and Installation |
[LH Exhaust Manifold]
| 1. |
Disconnect the battery negative terminal. |
| 2. |
Remove the engine cover.
(Refer to Engine and Transaxle Assembly - "Engine Cover") |
| 3. |
Remove the engine room under cover.
(Refer to Engine and Transaxle Assembly - "Engine Room Under Cover") |
| 4. |
Remove the front muffler.
(Refer to Intake And Exhaust System - "Muffler") |
| 5. |
Remove the oil level gauge.
(Refer to Lubrication System - "Oil Level Gauge & Pipe") |
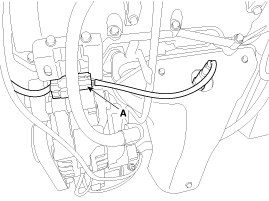
| 6. |
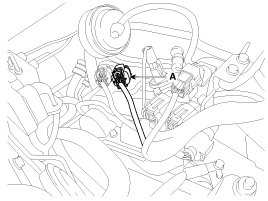
Disconnect the LH front oxygen sensor (HO2S) connector (A).
|
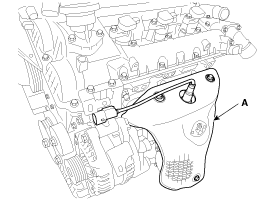
| 7. |
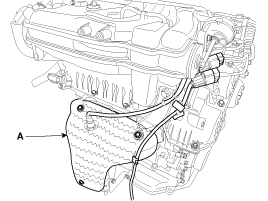
Remove the LH exhaust manifold heat protector (A).
|
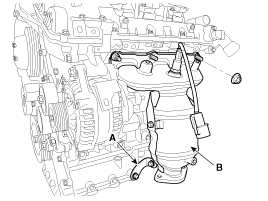
| 8. |
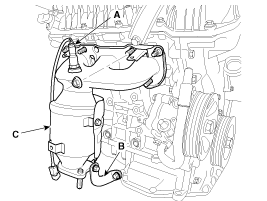
Remove the LH exhaust manifolds stay (A), and then remove the LH exhaust manifold (B) and gasket.
|
| 9. |
Install in the reverse order of removal.
|

[RH Exhaust Manifold]
| 1. |
Disconnect the battery negative terminal. |
| 2. |
Remove the engine cover.
(Refer to Engine and Transaxle Assembly - "Engine Cover") |
| 3. |
Remove the engine room under cover.
(Refer to Engine and Transaxle Assembly - "Engine Room Under Cover") |
| 4. |
Remove the front muffler.
(Refer to Intake And Exhaust System - "Muffler") |
| 5. |
Disconnect the RH front oxygen sensor (HO2S) connector (A).
|
| 6. |
Remove the RH exhaust manifold heat protector (A).
|
| 7. |
Remove the oxygen sensor (HO2S) (A). |
| 8. |
Remove the RH exhaust manifolds stay (B), and then remove the RH exhaust manifold (C) and gasket.
|
| 9. |
Install in the reverse order of removal.
|
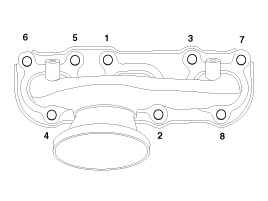
 Exhaust Manifold Components and Components Location
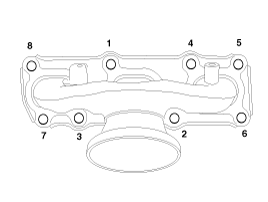
Components
1. LH Exhaust manifold gasket2. LH Exhaust manifold3. LH Heat protector4. LH Exhaust manifold stay5. RH Exhaust manifold gasket6. RH Exhaust manifold7. RH Heat protector8. RH Exhaust m ...
 Variable Intake Solenoid(VIS) Actuator Repair procedures
Removal and Installation
VIS 1 [Intake Manifold]
1.
Disconnect the battery "-" terminal.
2.
Remove the engine cover.
(Refer to Engine and Transaxle Assembly - "Engine Cover")
3.
Disconne ...
Other Information:
Front Bumper Cover Components and Components Location
Component Location
1. Front bumper cover
...
Fuel Pressure Control Valve (FPCV) Description and Operation
Description
Fuel Pressure Control Valve, installed on the high pressure
fuel pump, controls fuel flow into the injectors in accordance with the
ECM signal calculated based on various engine con ...
Categories
- Home
- First Generation
- Second Generation
- Third generation
- Kia Sedona YP 2014-2026 Owners Manual
- Kia Sedona YP 2014-2026 Service Manual

Copyright © www.kisedona.com 2016-2026