 Kia Sedona: Dynamic Damper Repair procedures
Third generation YP (2014-2026) / Kia Sedona YP Service Manual / Driveshaft and axle / Driveshaft Assembly / Dynamic Damper Repair procedures
| Removal |
| 1. |
Remove the front driveshaft.
(Refer to Driveshaft Assembly - “Front Driveshaft”) |
| 2. |
Remove the TJ joint assembly.
(Refer to Driveshaft Assembly - “TJ Joint”) |
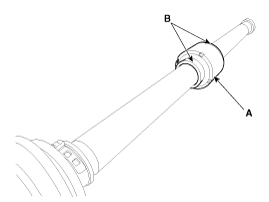
| 3. |
Remove the remove the both side of band (B) of the dynamic damper (A).
|
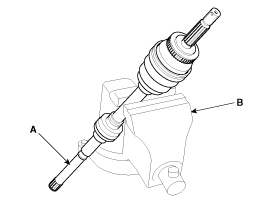
| 4. |
Fix the driveshaft (A) with a vice (B) as illustrated.
|
| 5. |
Apply soap powder on the shaft to prevent being damaged
between the shaft spline and the dynamic damper when the dynamic damper
is removed. |
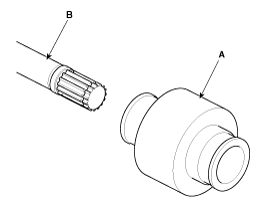
| 6. |
Seperate the dynamic damper (A) from the shaft (B) carefully.
|
| Installation |
| 1. |
Apply soap powder on the shaft to prevent being damaged between the shaft spline and the dynamic damper. |
| 2. |
Install the dynamic damper. |
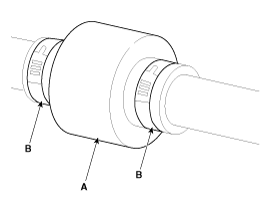
| 3. |
Install the dynamic damper band (A). |
| 4. |
Using the SST(09495-3K000), secure the TJ boot bands (B).
|
| 5. |
Install the TJ joint assembly.
(Refer to Driveshaft Assembly - “TJ joint”) |
| 6. |
Install the front driveshaft.
(Refer to Driveshaft Assembly - “Front Driveshaft”) |
| 7. |
Check the front alignment.
(Refer to Suspension System - "Front Alignment") |
 Dynamic Damper Components and Components Location
Components
1. BJ assembly2. BJ circlip3. BJ boot band4. BJ boot5. Dynamic damper band6. Dynamic damper7. Shaft8. TJ boot band9. TJ boot10. Spider assembly11. Retainer ring12. TJ housing13. Housin ...
 BJ Boot Components and Components Location
Components
1. BJ assembly2. BJ circlip3. BJ boot band4. BJ boot5. Dynamic damper band6. Dynamic damper7. Shaft8. TJ boot band9. TJ boot10. Spider assembly11. Retainer ring12. TJ housing13. Housin ...
Other Information:
Panic
The horn sounds and hazard warning lights flash for about 27 seconds if this
button is pressed for more than 0.5 second. To stop the horn and lights, press any
button on the transmitter. ...
Blade replacement
When the wipers no longer clean adequately, the blades may be worn or cracked,
and require replacement.
To prevent damage to the wiper arms or other components, do not attempt to move
the wipers ...
Categories
- Home
- First Generation
- Second Generation
- Third generation
- Kia Sedona YP 2014-2026 Owners Manual
- Kia Sedona YP 2014-2026 Service Manual

Copyright © www.kisedona.com 2016-2026