 Kia Sedona: Door Scuff Trim Repair procedures
Third generation YP (2014-2026) / Kia Sedona YP Service Manual / Body (Interior and Exterior) / Interior Trim / Door Scuff Trim Repair procedures
| Replacement |
|

Take care not to bend or scratch the trim and panels. |

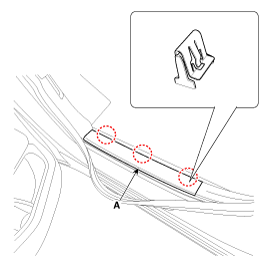
| [Front] |
| 1. |
Using a screwdriver or remover, remove the front door scuff trim (A).
|
| 2. |
Install in the reverse order of removal.
|

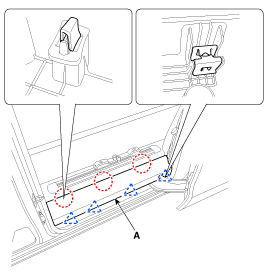
| [Rear] |
| 1. |
Using a screwdriver or remover, remove the rear door scuff trim (A).
|
| 2. |
Install in the reverse order of removal.
|
 Door Scuff Trim Components and Components Location
Component Location
1. Front door scuff trim2. Rear door scuff trim
...
 Cowl Side Trim Components and Components Location
Component Location
1. Cowl side trim
...
Other Information:
Sunroof Assembly Repair procedures
Replacement
Put on glove to protect your hands.
Take care not to scratch the interior trims and other parts.
1.
Remove the roof t ...
Auto defogging system
Auto defogging reduces the probability of fogging up the inside of the windshield
by automatically sensing the moisture of inside the windshield.
The auto defogging system operates when the heate ...
Categories
- Home
- First Generation
- Second Generation
- Third generation
- Kia Sedona YP 2014-2026 Owners Manual
- Kia Sedona YP 2014-2026 Service Manual

Copyright © www.kisedona.com 2016-2026