 Kia Sedona: Cylinder Head Repair procedures
Third generation YP (2014-2026) / Kia Sedona YP Service Manual / Engine Mechanical System / Cylinder Head Assembly / Cylinder Head Repair procedures
| Removal |
|

|

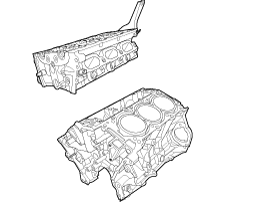
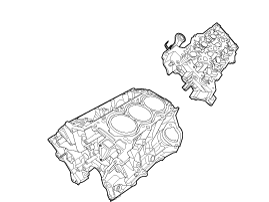
[RH Cylinder Head]
| 1. |
Remove the air duct.
(Refer to Intake And Exhaust System - "Air Cleaner") |
| 2. |
Remove the battery.
(Refer to Engine Electrical System - "Battery") |
| 3. |
Remove the engine cover.
(Refer to Engine And Transaxle Assembly - "Engine Cover") |
| 4. |
Remove the air cleaner assembly.
(Refer to Intake And Exhaust System - "Air Cleaner") |
| 5. |
Remove the engine room under cover.
(Refer to Engine And Transaxle Assembly - "Engine Room Under Cover") |
| 6. |
Drain the engine coolant.
(Refer to Cooling System - "Coolant") |
| 7. |
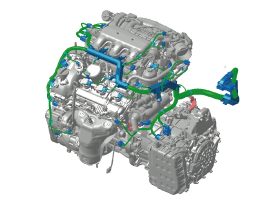
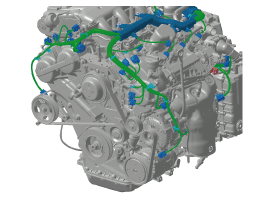
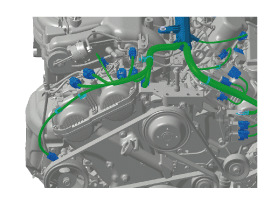
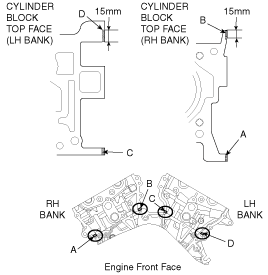
Disconnect the radiator upper hoses (A) and radiator lower hose (B).
|

| 8. |
Disconnect the control wiring harness connectors and
fasteners and remove the wiring harness protectors from the RH cylinder
head and surge tank.
|
| 9. |
Remove the surge tank.
(Refer to Intake And Exhaust System - "Surge Tank") |
| 10. |
Remove the intake manifold.
(Refer to Intake And Exhaust System - "Intake Manifold") |
| 11. |
Remove the RH exhaust manifold.
(Refer to Intake And Exhaust System - "Exhaust Manifold") |
| 12. |
Remove the power steering oil pump.
(Refer to Steering System - "Power Steering Oil Pump") |
| 13. |
Remove the RH cylinder head cover.
(Refer to Cylinder Head Assembly - "Cylinder Head Cover") |
| 14. |
Remove the timing chain.
(Refer to Timing System - "Timing Chain") |
| 15. |
Remove the water temperature control assembly.
(Refer to Cooling System - "Water Temperature Control Assembly") |
| 16. |
Remove the RH camshaft.
(Refer to Cylinder Head Assembly - "Camshaft") |
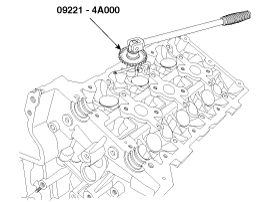
| 17. |
Remove the delivery pipe.
(Refer to Engine Control / Fuel System - "Delivery Pipe") |
| 18. |
Remove the RH cylinder head.
|

[LH Cylinder Head]
| 1. |
Remove the air duct.
(Refer to Intake And Exhaust System - "Air Cleaner") |
| 2. |
Remove the battery.
(Refer to Engine Electrical System - "Battery") |
| 3. |
Remove the engine cover.
(Refer to Engine And Transaxle Assembly - "Engine Cover") |
| 4. |
Remove the air cleaner assembly.
(Refer to Intake And Exhaust System - "Air Cleaner") |
| 5. |
Remove the engine room under cover.
(Refer to Engine And Transaxle Assembly - "Engine Room Under Cover") |
| 6. |
Drain the engine coolant.
(Refer to Cooling System - "Coolant") |
| 7. |
Disconnect the radiator upper hoses (A) and radiator lower hose (B).
|
| 8. |
Disconnect the control wiring harness connectors and
fasteners and remove the wiring harness protectors from the RH cylinder
head and surge tank.
|
| 9. |
Remove the surge tank.
(Refer to Intake And Exhaust System - "Surge Tank") |
| 10. |
Remove the intake manifold.
(Refer to Intake And Exhaust System - "Intake Manifold") |
| 11. |
Remove the LH exhaust manifold.
(Refer to Intake And Exhaust System - "Exhaust Manifold") |
| 12. |
Remove the alternator.
(Refer to Engine Electrical System - "Alternator") |
| 13. |
Remove the LH cylinder head cover.
(Refer to Cylinder Head Assembly - "Cylinder Head Cover") |
| 14. |
Remove the timing chain.
(Refer to Timing System - "Timing Chain") |
| 15. |
Remove the water temperature control assembly.
(Refer to Cooling System - "Water Temperature Control Assembly") |
| 16. |
Remove the LH camshaft.
(Refer to Cylinder Head Assembly - "Camshaft") |
| 17. |
Remove the delivery pipe.
(Refer to Engine Control / Fuel System - "Delivery Pipe") |
| 18. |
Remove the LH cylinder head.
|
| Disassembly |
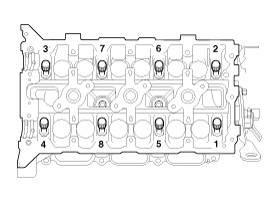
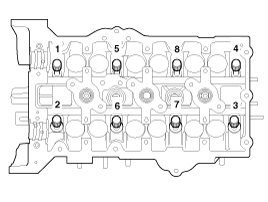
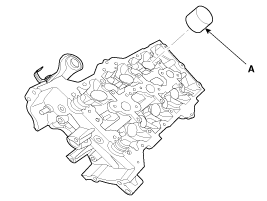
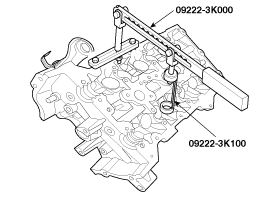
Identify MLA, valves and valve springs as they are removed so that each item can be reinstalled in its original position. |
| 1. |
Remove the MLAs (A).
|
| 2. |
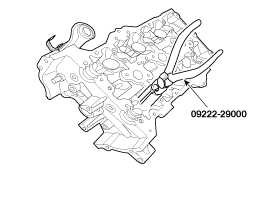
Remove the valves.
|
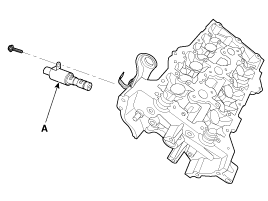
| 3. |
Remove the LH/RH intake camshaft OCV (A).
|
| Inspection |
Cylinder Head
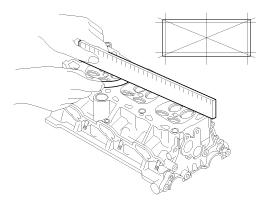
| 1. |
Inspect for flatness.
Using a precision straight edge and feeler gauge, measure the warpage of the surface contacting with the cylinder block
|
| 2. |
Inspect for cracks.
Check the combustion chamber, intake ports, exhaust ports and
cylinder block surface for cracks. If cracked, replace the cylinder
head. |
Valve And Valve Spring
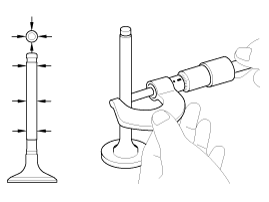
| 1. |
Inspect valve stems and valve guides.
|
| 2. |
Inspect valves.
|
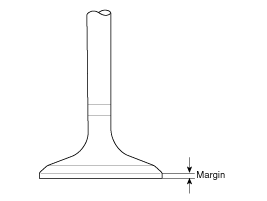
| 3. |
Inspect valve seats
Check the valve seat for evidence of overheating and improper contact with the valve face.
If the valve seat is worn, replace cylinder head.
Before reconditioning the seat, check the valve guide for
wear. If the valve guide is worn, replace cylinder head. Recondition the
valve seat with a valve seat grinder or cutter. The valve seat contact
width should be within specifications and centered on the valve face. |
| 4. |
Inspect valve springs.
|
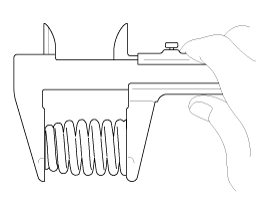
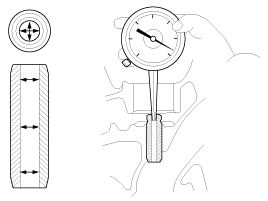
MLA
| 1. |
Inspect MLAs.
Using a micrometer, measure the MLA outer diameter.
|
| 2. |
Using a caliper gauge, measure MLA tappet bore inner diameter of cylinder head.
|
| 3. |
Subtract MLA outer diameter measurement from tappet bore inner diameter measurement.
|
| Reassembly |
Thoroughly clean all parts to be assembled.
Before installing the parts, apply fresh engine oil to all sliding and rotating surfaces.
Replace oil seals with new ones. |
| 1. |
Install the valves.
|
| 2. |
Install the MLAs.
Check that the MLA rotates smoothly by hand.
|
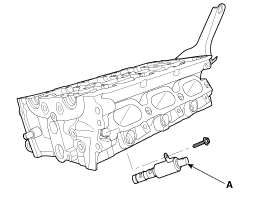
| 3. |
Install the LH/RH intake camshaft CVVT OCV (A).
|
| Installation |
|
[RH Cylinder Head]
| 1. |
Install the cylinder RH head.
|

| 2. |
Install the RH cylinder head bolts.
|
| 3. |
Install the rest of the parts in the reverse order of removal.
|
[LH Cylinder Head]
| 1. |
Install the cylinder LH head.
|
| 2. |
Install the LH cylinder head bolts.
|
| 3. |
Install the rest of the parts in the reverse order of removal.
|
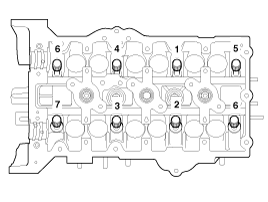
 Cylinder Head Components and Components Location
Components
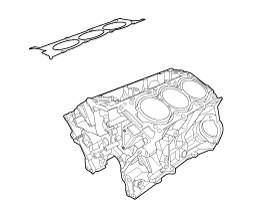
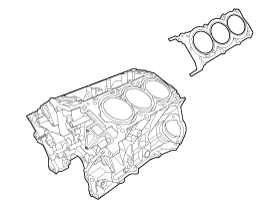
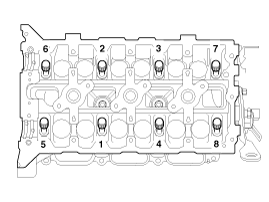
1. RH Cylinder head2. RH Cylinder head gasket3. LH Cylinder head4. LH Cylinder head gasket5. Cylinder block
1. Camshaft bearing cap 2. Camshaft thrust bearing cap 3. RH Exhaust ca ...

Other Information:
Non-operational conditions of rear parking assist system
The rear parking assist system may not operate properly when :
1. Moisture is frozen to the sensor. (It will operate normally when the moisture
has been cleared.)
2. The sensor is covered with for ...
Room lamp
Type A
Type B
Press the button(1) or lens(1) to turn the light on or off.
If the front map lamp turns on by the front map lamp switch, the room lamp will
turn on. ...
Categories
- Home
- First Generation
- Second Generation
- Third generation
- Kia Sedona YP 2014-2026 Owners Manual
- Kia Sedona YP 2014-2026 Service Manual

Copyright © www.kisedona.com 2016-2026