
 Kia Sedona: Temperature Control Actuator Repair procedures
Third generation YP (2014-2026) / Kia Sedona YP Service Manual / Heating,Ventilation And Air Conditioning / Heater / Temperature Control Actuator Repair procedures
| Inspection |
| 1. |
Turn the ignition switch OFF. |
| 2. |
Disconnect the temperature control actuator connector. |
| 3. |
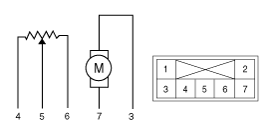
Verify that the temperature control actuator operates to the
cool position when 12V is connected to terminal 3 and ground to terminal
7.
Verify that the temperature control actuator operates to the warm position when connected in reverse.
|
| 4. |
Connect the temperature control actuator connector. |
| 5. |
Turn the ignition switch ON. |
| 6. |
Check the voltage between terminals 5 and 6.
Specification
It will feedback the current position of the actuator to controls. |
| 7. |
If the measured voltage is not within the specification,
substitute with a verified temperature control actuator and check for
proper operation. |
| 8. |
Replace the temperature control actuator if it is proved that there is a problem with it. |
| Replacement |
| [Driver''s side] |
| 1. |
Disconnect the negative (-) battery terminal. |
| 2. |
Remove the crash pad lower panel.
(Refer to Body - "Crash Pad Lower Panel") |
| 3. |
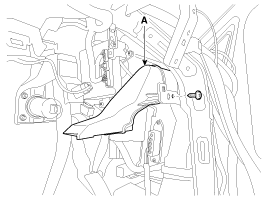
Remove the driver''s side shower duct (A) after loosening the screw.
|
| 4. |
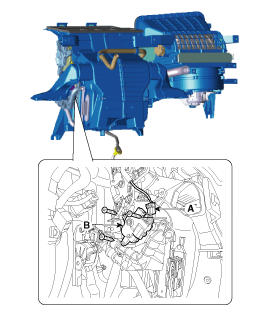
Disconnect the connector (A) and then remove the temperature control actuator (B) after loosening the mounting screws.
|
| 5. |
Install in the reverse order of removal. |
| [Passenger''s side] |
| 1. |
Disconnect the negative (-) battery terminal. |
| 2. |
Remove the glove box housing.
(Refer to Body - "Glove Box Housing") |
| 3. |
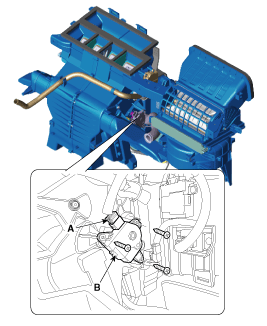
Disconnect the connector (A) and then remove the temperature control actuator (B) after loosening the mounting screws.
|
| 4. |
Install in the reverse order of removal. |
 Temperature Control Actuator Description and Operation
Description
The heater unit includes mode control actuator and temperature control actuator.
Located in the heater unit, the temperature control actuator regulates the temperature in the following ...
 Mode Control Actuator Description and Operation
Description
Located in the heater unit, the mode control actuator adjusts
the position of the mode door by operating the mode control actuator
according to the signal from the A/C control unit. ...
Other Information:
Brake Pedal Components and Components Location
Components
1. Cowl bracket2. Brake pedal member assembly3. Brake switch4. Return spring5. Brake pedal stopper6. Clevis pin7. Snap pin8. Brake pedal
...
Side Airbag (SAB) Module Repair procedures
Removal
1.
Disconnect the battery negative cable, and wait for at least 30 seconds before beginning to work.
2.
Remove the front seat assembly.
(Refer to Body - "Front seat assembly")
3. ...
Categories
- Home
- First Generation
- Second Generation
- Third generation
- Kia Sedona YP 2014-2026 Owners Manual
- Kia Sedona YP 2014-2026 Service Manual

Copyright © www.kisedona.com 2016-2026