1.
Turn the ignition switch OFF.
2.
Disconnect the PCSV connector.
3.
Measure resistance between the PCSV terminals 1 and 2.
4.
Check that the resistance is within the specification.
Specification: 22.0 ~ 26.0 [20°C(68°F)]
1.
Turn the ignition switch OFF and disconnect the battery negative (-) terminal.
2.
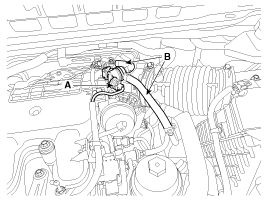
Disconnect the purge control solenoid valve connector (A).
3.
Disconnect the vapor hoses (B) from the purge control solenoid valve.
4.
Remove the valve from the bracket.
•
Install the component to the specified torques.
•
Note that internal damage may occur when the component is dropped. If the component has been dropped, inspect before installing.
•
Be careful not to apply oil or lubricant to the end of the hoses when connecting the PCSV hose.
•
Be careful not to let foreign material to flow into the valve.
1.
Install in the reverse order of removal.
Purge control solenoid valve bracket mounting bolt:
9.8 ~ 11.8 N.m (1.0 ~ 1.2 kgf.m 7.2 ~ 8.7 lb-ft)
Specification
ItemSpecificationCoil Resistance (Ω)9.4 ~ 10.4 [20°C(68°F)]
...
 Kia Sedona: Purge Control Solenoid Valve (PCSV) Repair procedures
 Purge Control Solenoid Valve (PCSV) Schematic Diagrams
 CVVT Oil Control Valve (OCV) Specifications

