 Kia Sedona: Power Door Mirror Switch Repair procedures
Third generation YP (2014-2026) / Kia Sedona YP Service Manual / Body Electrical System / Power Door Mirrors / Power Door Mirror Switch Repair procedures
| Inspection |
[Power Mirror Switch (Non-IMS]
| 1. |
Disconnect the negative (-) battery terminal. |
| 2. |
Remove the front left door trim.
(Refer to Body - "Front Door Trim") |
| 3. |
Disconnect the power mirror switch connector from the door trim.
|
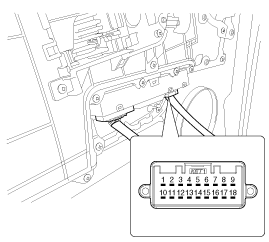
| 4. |
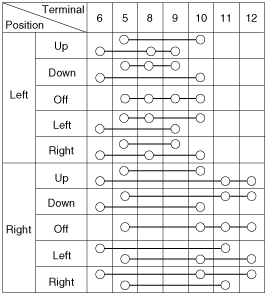
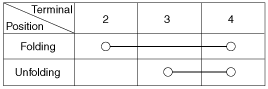
Check for continuity between the terminals in each switch position according to the table.
[Power Mirror Switch]
[Power Folding Mirror Switch]
|
Diagnosis With GDS
| 1. |
The body electrical system can be quickly diagnosed for faulty parts using vehicle diagnostic system (GDS).
The diagnostic system (GDS) provides the following information:
|
| 2. |
Select the ''Car model'' and the system to be checked in order to check the vehicle with the tester. |
| 3. |
Select the ''Body Control Module (BCM)'' to check the driver seat or assistant door module (DDM/ADM). |
| 4. |
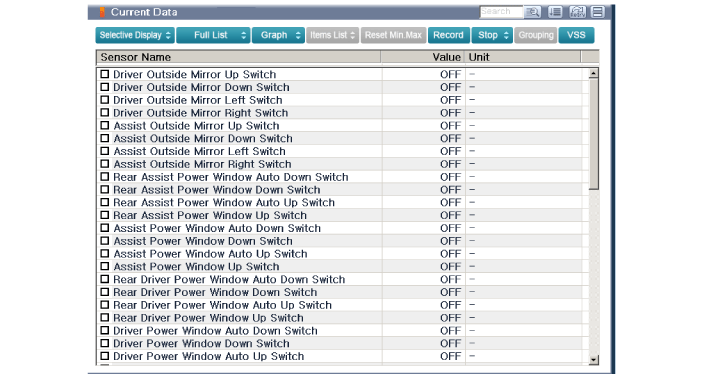
Select the "Current Data" menu to search the current state of the input/output data.
The input/output data for the sensors corresponding to the driver seat or assistant door module(DDM/ADM) can be checked.
|
| 5. |
If you wish to check the power door lock operation by force, select "Actuation test". |
| Removal |
|

Driver Power Window Switch
| 1. |
Disconnect the negative (-) battery terminal. |
| 2. |
Remove the front door trim.
(Refer to Body - "Front Door Trim") |
| 3. |
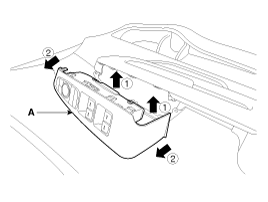
Loosen the front door armrest (A) mounting screws.
|
| 4. |
Using a screwdriver or remover, separate the mounting clips and then remove the driver door module panel (A).
|
| 5. |
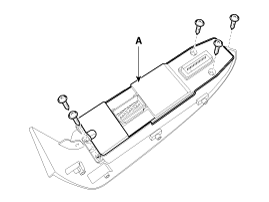
Loosen the mounting screws and then remove the driver door module(DDM) (A) after separating the mounting clips.
|
| Installation |
| 1. |
Install the driver door module (DDM). |
| 2. |
Install the driver door module panel. |
| 3. |
Install the front door armrest mounting screws. |
| 4. |
Install the front door trim. |
| 5. |
Connect the negative (-) battery terminal. |
 Power Door Mirror Switch Schematic Diagrams
Circuit Diagram
...
 Power Door Mirror Actuator Repair procedures
Inspection
1.
Disconnect the negative (-) battery terminal.
2.
Remove the front door quadrant inner cover (A).
3.
Disconnect the power door mirror connector from the harness.
4.
Apply ...
Other Information:
Rail Pressure Sensor (RPS) Schematic Diagrams
Circuit Diagram
...
Front Door Belt Inside Weatherstrip Repair procedures
Replacement
1.
Remove the front door trim.
(Refer to Front Door - "Front Door Trim")
2.
Remove the front door belt inside weatherstrip (A).
3.
Install in the reverse order of removal.
...
Categories
- Home
- First Generation
- Second Generation
- Third generation
- Kia Sedona YP 2014-2026 Owners Manual
- Kia Sedona YP 2014-2026 Service Manual

Copyright © www.kisedona.com 2016-2026