 Kia Sedona: Alternator Repair procedures
Third generation YP (2014-2026) / Kia Sedona YP Service Manual / Engine Electrical System / Charging System / Alternator Repair procedures
| Removal |
| 1. |
Disconnect the battery negative (-) terminal. |
| 2. |
Remove the cooling fan.
(Refer to Engine Mechanical System - "Cooling Fan") |
| 3. |
Lift the vehicle. |
| 4. |
Remove the engine room RH side cover.
(Refer to Engine Mechanical System - Engine Room Under Cover - Repair procedures - "Engine Room Side Cover") |
| 5. |
To release the auto tension pully (A), turn the drive belt tensioner counterclockwise.
|
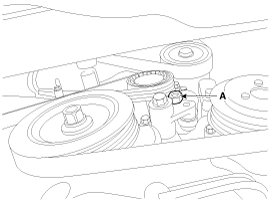
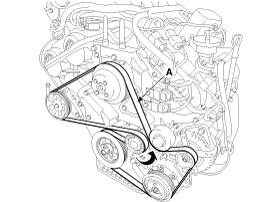
| 6. |
Remove the drive belt (A).
|
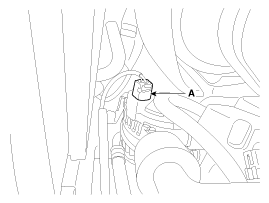
| 7. |
Disconnect the alternator connector (A).
|
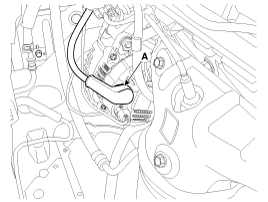
| 8. |
Disconnect the alternator cable (A) from the ''B'' terminal.
|
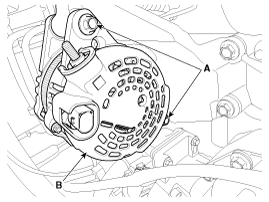
| 9. |
Remove the alternator (B) after loosening the mounting bolts (A).
|
| Installation |
| 1. |
Install in the reverse order of removal. |
| 2. |
Install the drive belt.
(Refer to Engine Mechanical System - "Drive Belt") |
 Alternator Schematic Diagrams
Circuit Diagram
•
COM signal - When
controlling the voltage generated, the ECM sends the target voltage data
to the alternator via a PWM signal (High volta ...
 Battery Specifications
Specification
ItemSpecificationModel typeCMF80L-BCICapacity [20HR/5HR] (AH)80/64 Cold Cranking Amperage (A)660 (SAE) / 528 (EN)Reserve Capacity (Min)145
•
...
Other Information:
Front fog lamp bulbs
Type A
Type B
1. Remove the front bumper under cover.
2. Reach your hand into the back of the front bumper.
3. Disconnect the power connector from the socket.
4. Remove the bulb-socket from ...
Torque Converter Control Solenoid Valve (T/CON_VFS) Specifications
Specification
Item SpecificationControl typeN/L (Normal Low)Control pressure kpa (kgf/cm², psi)"9.81 ~ 500.14 (0.1 ~ 5.1, 1.42 ~ 72.54)"Current value (mA)50 ~ 850Coil resistance(Ω)5.1 ± 0.3
...
Categories
- Home
- First Generation
- Second Generation
- Third generation
- Kia Sedona YP 2014-2026 Owners Manual
- Kia Sedona YP 2014-2026 Service Manual

Copyright © www.kisedona.com 2016-2026