 Kia Sedona: Oil Pressure Switch Repair procedures
Third generation YP (2014-2026) / Kia Sedona YP Service Manual / Engine Mechanical System / Lubrication System / Oil Pressure Switch Repair procedures
| Removal and Installation |
| 1. |
Remove the air duct.
(Refer to Intake And Exhaust System - "Air Cleaner") |
| 2. |
Remove the battery.
(Refer to Engine Electrical System - "Battery") |
| 3. |
Remove the air cleaner assembly.
(Refer to Intake And Exhaust System - "Air Cleaner") |
| 4. |
Remove the surge tank.
(Refer to Intake And Exhaust System - "Surge Tank") |
| 5. |
Remove the intake manifold.
(Refer to Intake And Exhaust System - "Intake Manifold") |
| 6. |
Remove the delivery pipe and injector.
(Refer to Engine Control / Fuel System - "Delivery Pipe") |
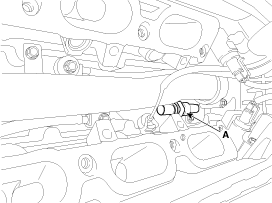
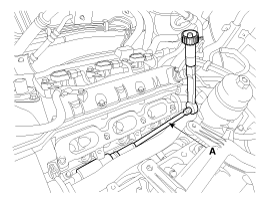
| 7. |
Remove the oil pressure switch (A) after disconnecting the connector.
|

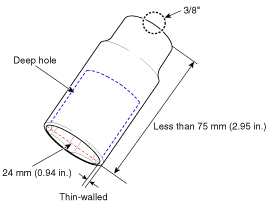
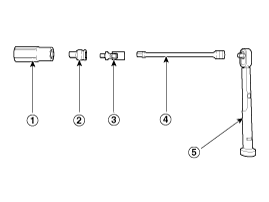
 24mm deep socket
 1/2" to 3/8" drive socket adapter (only if using 1/2" drive deep socket)
 3/8" universal joint
 3/8" extension bar
 Socket wrench
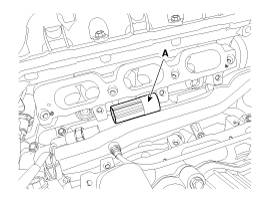
| 8. |
Install in the reverse order of removal.
|
| Inspection |
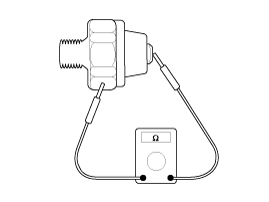
| 1. |
Check the continuity between the terminal and the body with an ohmmeter.
If there is no continuity, replace the oil pressure switch.
|
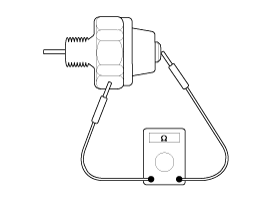
| 2. |
Check the continuity between the terminal and the body when
the fine wire is pushed. If there is continuity even when the fine wire
is pushed, replace the switch.
|
| 3. |
If there is no continuity when a 50 kpa (7 psi) is applied
through the oil hole, the switch is operating properly. Check for air
leakage. If air leaks, the diaphragm is broken. Replace it. |
 Oil Pressure Switch Components and Components Location
Components
1. Oil cover2. Oil cover gasket3. Oil pressure switch
...
 Oil Level Gauge & Pipe Components and Components Location
Components
1. Oil level gauge2. Oil level gauge pipe3. O-ring
...
Other Information:
Front Impact Sensor (FIS) Description and Operation
Description
The Front Impact Sensors (FIS) are installed in the Front End
Module (FEM). These remote sensors are used to detect acceleration due
to a collision at the mounting location. The pri ...
Ignition switch position
LOCK
The steering wheel locks to protect against theft (if equipped). The ignition
key can be removed only in the LOCK position.
ACC (Accessory)
The steering wheel is unlocked and electrical ac ...
Categories
- Home
- First Generation
- Second Generation
- Third generation
- Kia Sedona YP 2014-2026 Owners Manual
- Kia Sedona YP 2014-2026 Service Manual

Copyright © www.kisedona.com 2016-2026