 Kia Sedona: Repair procedures
Third generation YP (2014-2026) / Kia Sedona YP Service Manual / Body Electrical System / Horn / Repair procedures
| Removal |
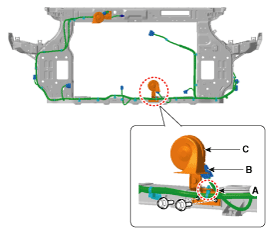
[Horn (Low pitch)]
| 1. |
Remove the engine room under cover.
(Refer to Engine Mechanical System - "Engine Room Under Cover") |
| 2. |
Remove the mounting clip (A). |
| 3. |
Remove the low pitch horn (C) after disconnecting the horn connector (B) and loosening the mounting bolts.
|
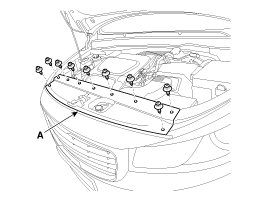
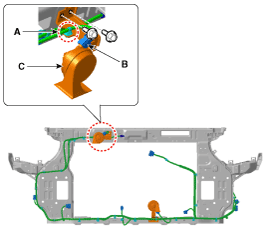
[Horn (High pitch)]
| 1. |
Remove the front bumper upper cover (A) after loosening the screws.
|
| 2. |
Remove the mounting clip (A). |
| 3. |
Remove the high pitch horn (C) after disconnect the horn connector (B) and loosening the mounting the bolts.
|
| Installation |
[Horn (Low pitch)]
| 1. |
Install the low pitch horn after connecting the connector. |
| 2. |
Install the mounting clip. |
| 3. |
Install the engine room under cover. |
[Horn (High pitch)]
| 1. |
Install the high pitch horn after connecting the connector. |
| 2. |
Install the mounting clip. |
| 3. |
Install the front bumper upper cover. |
| Inspection |
| 1. |
The relay on the horn of this vehicle is implanted into the metal core block PCB of the engine room relay block. |
The relay inserted in the semi-conductor on the PCB cannot be
replaced on its own, instead, it must be replaced as a complete unit.
The internal metal core box must be tested and replaced with new part
when refurbished. |
 Components and Components Location
Component Location
1. Horn switch2. Horn relay (Built-in Metal Core Block PCB)3. Horn (Low pitch)4. Horn (High pitch)5. Clock spring
...
Other Information:
Repair procedures
Adjustment
TCM adaptive values learning
•
TCM adaptive values learning: When shift shock is occurred or
parts related with the transaxle are replaced, TCM learning should be
performe ...
Sunroof Sunshade Repair procedures
Replacement
[Front]
1.
Remove the sunroof assembly.
(Refer to Sunroof - "Sunroof Assembly")
2.
Loosen the mounting screws and remove the sunshade stoper (A).
3.
Loosen the nuts and re ...
Categories
- Home
- First Generation
- Second Generation
- Third generation
- Kia Sedona YP 2014-2026 Owners Manual
- Kia Sedona YP 2014-2026 Service Manual
Copyright © www.kisedona.com 2016-2026


