 Kia Sedona: Rear Pillar Trim Repair procedures
Third generation YP (2014-2026) / Kia Sedona YP Service Manual / Body (Interior and Exterior) / Interior Trim / Rear Pillar Trim Repair procedures
| Replacement |
[Rear Pillar Trim]
|

Take care not to bend or scratch the trim and panels. |

| 1. |
Remove the luggage side trim.
(Refer to Interior Trim - "Luggage Side Trim") |
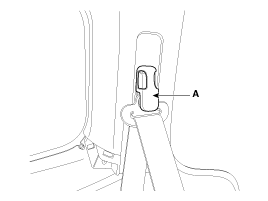
| 2. |
Remove the second row seat belt upper anchor cover (A) using a screw driver or remover.
|
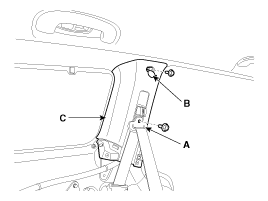
| 3. |
Remove the second row seat belt upper anchor (A) after loosening the mounting bolts. |
| 4. |
Open the cap (B), then remove the rear pillar trim (C) after loosening the mounting bolts.
|
| 5. |
Install in the reverse order of removal.
|

[Tailgate Pillar Trim]
|
Take care not to bend or scratch the trim and panels. |
| 1. |
Remove the tailgate weatherstrip.
(Refer to Tailgate - "Tailgate Weatherstrip") |
| 2. |
Loosen the third row seat belt lower anchor mounting bolt . |
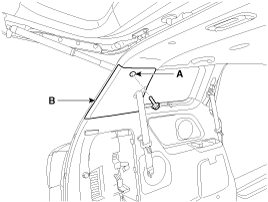
| 3. |
Open the cap (A), then remove the tailgate pillar trim (B) after loosening the mounting bolt.
|
| 4. |
Install in the reverse order of removal.
|
 Rear Pillar Trim Components and Components Location
Component Location
1. Rear pillar trim
...
 Trunk Trim
...
Other Information:
Description and Operation
Description
Windshield deicer system prevents windshield wiper from
freezing in the winter season. It consists of deicer in the lower part
of windshield, switch and relay. Body control module r ...
Removing the tumble seat (for 8 passenger vehicle)
1. Insert the seat belt in the belt assembly cover.
2. Insert the seat belt buckle in the seat cushion pocket.
3. Lower the headrest to the lowest position.
4. Slide the seat to the farthest ...
Categories
- Home
- First Generation
- Second Generation
- Third generation
- Kia Sedona YP 2014-2026 Owners Manual
- Kia Sedona YP 2014-2026 Service Manual

Copyright © www.kisedona.com 2016-2026