 Kia Sedona: Sunroof Assembly Repair procedures
Third generation YP (2014-2026) / Kia Sedona YP Service Manual / Body (Interior and Exterior) / Sunroof / Sunroof Assembly Repair procedures
| Replacement |
Put on glove to protect your hands. |

Take care not to scratch the interior trims and other parts. |

| 1. |
Remove the roof trim.
(Refer to Roof Trim - "Roof Trim Assembly") |
| 2. |
Remove the sunroof glass.
(Refer to Sunroof - "Sunroof Glass") |
| 3. |
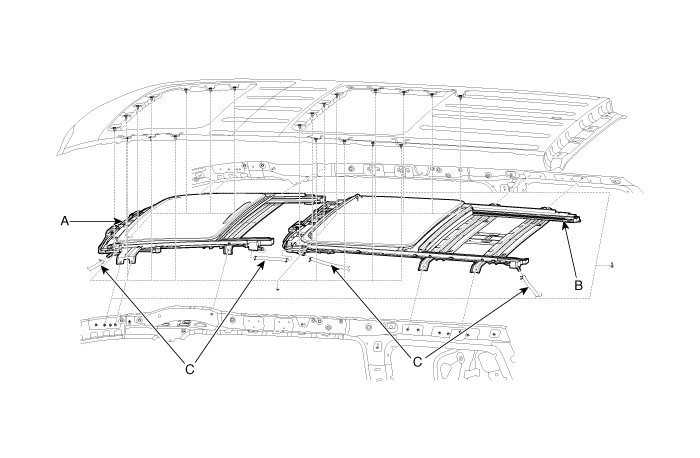
Disconnect the drain tubes (B). |
| 4. |
Loosen the mounting nuts and remove the front sunroof assembly (A), and rear sunroof assembly (B).
|
| 5. |
Install in the reverse order of removal.
|

 Sunroof Deflector Repair procedures
Replacement
1.
Completely open the sunroof glass (A) by pressing the sunroof switch.
2.
Loosen the sunroof deflector mounting screws.
3.
Remove the sunroof deflector (A).
4.
Install i ...
 Sunroof Sunshade Repair procedures
Replacement
[Front]
1.
Remove the sunroof assembly.
(Refer to Sunroof - "Sunroof Assembly")
2.
Loosen the mounting screws and remove the sunshade stoper (A).
3.
Loosen the nuts and re ...
Other Information:
Emergency Fastening Device (EFD) Description and Operation
Description
Emergency Fastening Device (EFD) is deployed concurrently
with the Belt Pretensioner to strongly pull down the seat belt during a
deployment condition after a collision. It is locat ...
Canister Repair procedures
Removal
1.
Turn the ignition switch OFF and disconnect the negative (-) battery terminal.
2.
Remove the fuel tank.
(Refer to Engine Control / Fuel System - "Fuel Tank")
3.
Disconnect the ...
Categories
- Home
- First Generation
- Second Generation
- Third generation
- Kia Sedona YP 2014-2026 Owners Manual
- Kia Sedona YP 2014-2026 Service Manual

Copyright © www.kisedona.com 2016-2026