 Kia Sedona: Passenger Airbag (PAB) Module Repair procedures
Third generation YP (2014-2026) / Kia Sedona YP Service Manual / Restraint / Airbag Module / Passenger Airbag (PAB) Module Repair procedures
| Removal |
| 1. |
Disconnect the battery negative cable and wait for at least 30 seconds before beginning to work. |
| 2. |
Remove the main crash pad.
(Refer to Body - "main crash pad assembly ")
|

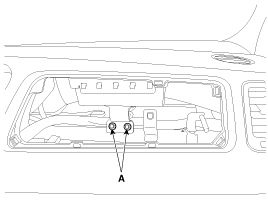
| 3. |
Remove the passenger airbag mounting nuts (A).
|
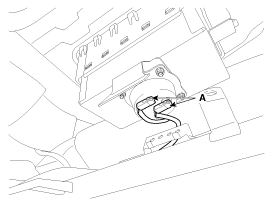
| 4. |
Disconnect the passenger airbag connector (A).
|
| 5. |
Remove the mounting bolts from the crash pad. Then remove the passenger airbag.
|

| Installation |
| 1. |
Remove the ignition key from the vehicle. |
| 2. |
Disconnect the battery negative cable from the battery and wait for at least 30 seconds before beginning to work. |
| 3. |
Place a passenger airbag on the crash pad and tighten the passenger airbag mounting bolts (A).
|
| 4. |
Install the crash pad.
(Refer to Body - "Main crash pad assembly") |
| 5. |
Tighten the passenger airbag mounting bolts.
|
| 6. |
Connect the passenger airbag harness connector to the SRS main harness connector. |
| 7. |
Reconnect the battery negative cable. |
| 8. |
After installing the passenger airbag (PAB), confirm proper system operation:
|

 Side Airbag (SAB) Module Description and Operation
Description
The Side Airbags (SAB) are installed inside the front seat to
protect the driver and front passenger from danger when side crash
occurs. The SRSCM determines deployment of side airb ...
Other Information:
Injector Schematic Diagrams
Circuit Diagram
...
External AMP Repair procedures
Removal
1.
Disconnect the negative (-) battery terminal.
2.
Remove the main crash pad assembly.
(Refer to Body - "Main Crash Pad Assembly")
3.
Remove the body control module.
(Refer to " ...
Categories
- Home
- First Generation
- Second Generation
- Third generation
- Kia Sedona YP 2014-2026 Owners Manual
- Kia Sedona YP 2014-2026 Service Manual

Copyright © www.kisedona.com 2016-2026