 Kia Sedona: Repair procedures
Third generation YP (2014-2026) / Kia Sedona YP Service Manual / Body Electrical System / Horn / Repair procedures
| Removal |
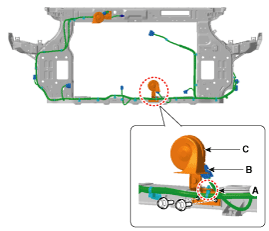
[Horn (Low pitch)]
| 1. |
Remove the engine room under cover.
(Refer to Engine Mechanical System - "Engine Room Under Cover") |
| 2. |
Remove the mounting clip (A). |
| 3. |
Remove the low pitch horn (C) after disconnecting the horn connector (B) and loosening the mounting bolts.
|
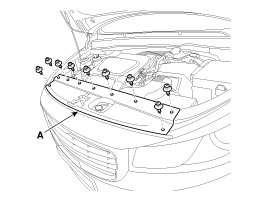
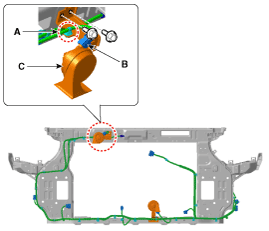
[Horn (High pitch)]
| 1. |
Remove the front bumper upper cover (A) after loosening the screws.
|
| 2. |
Remove the mounting clip (A). |
| 3. |
Remove the high pitch horn (C) after disconnect the horn connector (B) and loosening the mounting the bolts.
|
| Installation |
[Horn (Low pitch)]
| 1. |
Install the low pitch horn after connecting the connector. |
| 2. |
Install the mounting clip. |
| 3. |
Install the engine room under cover. |
[Horn (High pitch)]
| 1. |
Install the high pitch horn after connecting the connector. |
| 2. |
Install the mounting clip. |
| 3. |
Install the front bumper upper cover. |
| Inspection |
| 1. |
The relay on the horn of this vehicle is implanted into the metal core block PCB of the engine room relay block. |
The relay inserted in the semi-conductor on the PCB cannot be
replaced on its own, instead, it must be replaced as a complete unit.
The internal metal core box must be tested and replaced with new part
when refurbished. |

 Components and Components Location
Component Location
1. Horn switch2. Horn relay (Built-in Metal Core Block PCB)3. Horn (Low pitch)4. Horn (High pitch)5. Clock spring
...

Other Information:
Antenna Repair procedures
Removal
1.
Remove the roof trim assembly.
(Refer to Body - "Roof Trim Assembly")
2.
Disconnect the roof antenna connectors (A).
3.
Remove the roof antenna (A) after loosening a nut (B).
...
Walk-in seat (2nd row seat)
To get in or out from the 3rd row seat,
1. Lift the armrest up and lower the head rest to the lowest position (if necessary).
2. Pull up the walk-in lever (1) or pull the walk-in strap (2) on the ...
Categories
- Home
- First Generation
- Second Generation
- Third generation
- Kia Sedona YP 2014-2026 Owners Manual
- Kia Sedona YP 2014-2026 Service Manual

Copyright © www.kisedona.com 2016-2026