 Kia Sedona: Relay Box (Engine Compartment) Repair procedures
Third generation YP (2014-2026) / Kia Sedona YP Service Manual / Body Electrical System / Fuses And Relays / Relay Box (Engine Compartment) Repair procedures
| Inspection |
| 1. |
Disconnect the negative (-) battery terminal. |
| 2. |
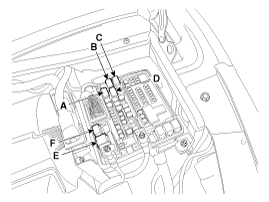
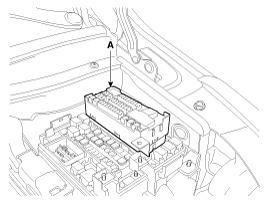
Pull out the relay from the engine compartment relay block. |
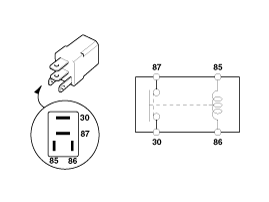
Power Relay (Type A)
Check for continuity between the terminals.
A : PDM relay 1
B : PDM relay 2
C : PDM relay 3
D : Start relay
E : Cooling fan1 relay
F : Cooling fan2 relay
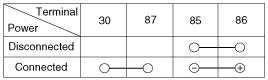
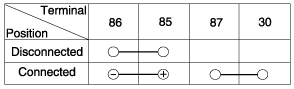
| 1. |
There should be continuity between terminals No.30 and No.87 when power and ground are connected to terminals No.85 and No.86. |
| 2. |
There should be no continuity between terminals No.30 and No.87 when power is disconnected.
|
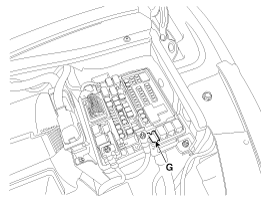
Power Relay (Type B)
Check for continuity between the terminals.
G : Fog lamp front relay
| 1. |
There should be continuity between terminals No. 30 and No.
87 when power and ground are connected to terminals No. 85 and No. 86. |
| 2. |
There should be no continuity between terminals No. 30 and No. 87 when power is disconnected.
|

Metal Core PCB block
| 1. |
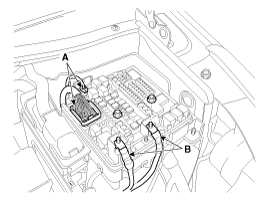
Disconnect the negative (-) battery terminal. |
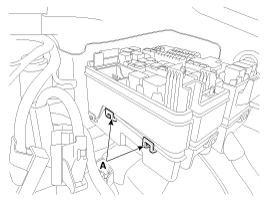
| 2. |
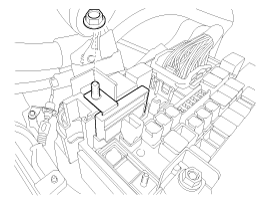
Disconnect the engine room relay box connector (A). |
| 3. |
Remove the power cable (B) after loosening the nuts.
|
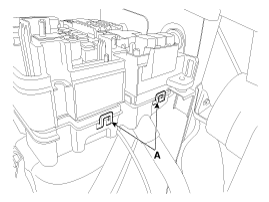
| 4. |
Loosen the engine room relay box mounting nuts (A).
|
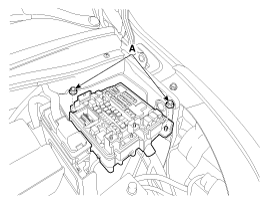
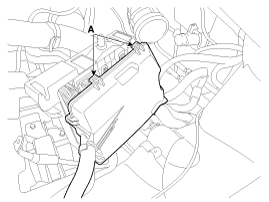
| 5. |
Remove the engine room relay box from the hole (A).
|
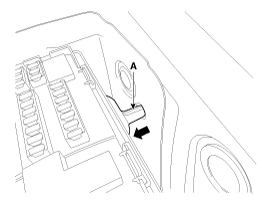
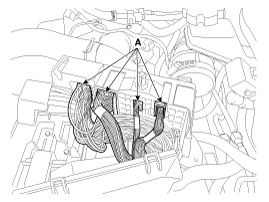
| 6. |
Separate the mounting hooks (A) from the engine room relay box lower cover.
|
| 7. |
Disconnect the metal core PCB block connector (A).
|
| 8. |
Remove the metal core PCB block (A) by pulling it up.
|
Fuse Inspection
| 1. |
Be sure that there is no loose part in the fuse holders and that the fuses are held securely. |
| 2. |
Are the fuse capacities for each circuit correct? |
| 3. |
Are there any blown fuses?
|

Multi Fuse
| 1. |
Engine room fuse is used to optimize the package.
|

 Relay Box (Engine Compartment) Components and Components Location
Components
Engine Room Junction Block
PCB Block
...

Other Information:
Smart key Repair procedures
Smart Key
Smart Key Code Saving
1.
Connect the DLC cable of GDS to the data link connector (16
pins) in driver side crash pad lower panel, and then turn the power on
GDS.
2.
Select the ve ...
Categories
- Home
- First Generation
- Second Generation
- Third generation
- Kia Sedona YP 2014-2026 Owners Manual
- Kia Sedona YP 2014-2026 Service Manual

Copyright © www.kisedona.com 2016-2026