 Kia Sedona: Rear Pillar Trim Repair procedures
Third generation YP (2014-2026) / Kia Sedona YP Service Manual / Body (Interior and Exterior) / Interior Trim / Rear Pillar Trim Repair procedures
| Replacement |
[Rear Pillar Trim]
|

Take care not to bend or scratch the trim and panels. |

| 1. |
Remove the luggage side trim.
(Refer to Interior Trim - "Luggage Side Trim") |
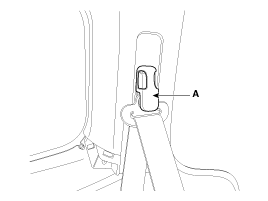
| 2. |
Remove the second row seat belt upper anchor cover (A) using a screw driver or remover.
|
| 3. |
Remove the second row seat belt upper anchor (A) after loosening the mounting bolts. |
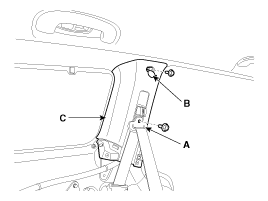
| 4. |
Open the cap (B), then remove the rear pillar trim (C) after loosening the mounting bolts.
|
| 5. |
Install in the reverse order of removal.
|

[Tailgate Pillar Trim]
|
Take care not to bend or scratch the trim and panels. |
| 1. |
Remove the tailgate weatherstrip.
(Refer to Tailgate - "Tailgate Weatherstrip") |
| 2. |
Loosen the third row seat belt lower anchor mounting bolt . |
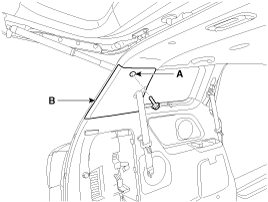
| 3. |
Open the cap (A), then remove the tailgate pillar trim (B) after loosening the mounting bolt.
|
| 4. |
Install in the reverse order of removal.
|
 Rear Pillar Trim Components and Components Location
Component Location
1. Rear pillar trim
...
 Trunk Trim
...
Other Information:
Line Pressure Control Solenoid Vale Repair procedures
Inspection
1.
Turn ignition switch OFF.
2.
Remove the battery and battery tray.
(Refer to Engine Electrical System - "Battery")
3.
Disconnect the solenoid valve connector (A).
4.
Me ...
Rear Door Belt Inside Weatherstrip Repair procedures
Replacement
1.
Remove the rear door trim.
(Refer to Rear Door - "Rear Door Trim")
2.
Remove the rear door belt inside weatherstrip (A).
3.
Install in the reverse order of removal.
...
Categories
- Home
- First Generation
- Second Generation
- Third generation
- Kia Sedona YP 2014-2026 Owners Manual
- Kia Sedona YP 2014-2026 Service Manual

Copyright © www.kisedona.com 2016-2026